Archive

Monthly Archives: February 2020

Removing tile adhesive is not a difficult job to do. Many people remove the tile from their floors to get to the beautiful natural floor that lies beneath the tiles. What they don’t realize is the majority of the time linoleum is glued down when the tiles are installed. Even after removing the linoleum, you may have to do extra cleaning to remove the residue from the glue.

What You’ll Need

  • Hot water
  • Towels
  • Paint scraper
  • Floor sander
  • Heat gun
  • WD40
  • Rag
  • Goof-Off

Step 1 – Preparation
Using spare towels and rags, cover a big section of the floor. Pour boiling water on the towels and let it cool enough to handle. After about 10 or 15 minutes, use the towels to remove the adhesive.

Step 2 – Scrape
Scrape away old glue being careful not to scratch the hardwood surface. If you don’t want to go this route, you can rent a floor sander to use instead. This option will cost more money than just using rags, but is a lot less labor intensive.

Step 3 – Use Heat Gun
Often you will come across stubborn spots where you will find extremely difficult to remove the adhesive. These can be found mostly at the corners of the floor. In such a case, you can use a heat gun. You need to blow hot air on the stubborn spots which will loosen the glue. Then you can go back to the scraping method when excessive glue is removed.

Step 4 – Use Chemicals
If you still find areas where you are unable to remove the glue, then opt for chemical remover. Although, this is the last and less desired option to remove the adhesive. This should only be used on spots that could not be removed by the steps above. Keep in mind this last method could leave damaged spots on the floor.

Step 5 – Clean Surface
After you have removed the glue, you have to prepare the floor for the new flooring. In order to so sweep the floor and then mops it.

Removal Tips
Remember that most of the floor’s original finish will come off with the sanding and removing of the glue.
Be sure and take a look at the type of floor underneath the tiles so you can have the needed stain or finishing material to give the floor a nice finish.

Removing adhesive can take a while so make sure you have enough time to get the job accomplished.

After Removal Maintenance Tips:
Using Water: Hardwood can get water damaged so you can’t apply the same amount of water to the flooring as you did to the tiles.
Using a Vacuum: A vacuum can be used on the flooring to collect the dust but if you are afraid that this will scratch the floor. It is suggested to us a dust mop instead.

Touch Up: There are times when the flooring is going to need touch-ups. To do this you can use touch up sticks. For larger areas you can use small tubs of stain.

Before you decide that you want to return to the hardwoods flooring underneath your tile consider the work that it takes to maintain it.


Source: www.DoItYoursef.com

Although you may think that putting up your own self adhesive wall tiles can be a hard process, it is actually quite easy. It can be a lengthy process because you need to take your time and if this is the first time you are doing this then you will want to be extra careful. When you are using tiles that are self adhesive for the wall, you are going to find that the process is very different from the traditional method except, that you need to prep the wall before you begin.

What You’ll Need

  • Hot dipped galvanized fasteners
  • Joint compound
  • Self-adhesive tiles
  • Fiberglass tape
  • Cleanser
  • Sandpaper
  • Drywall compound
  • Mud easel
  • Green board
  • Trowel
  • Tiles spacers
  • Grout float
  • Tile cutter
  • Grout
  • Sponge
  • Caulking
  • Grout sealer

Step 1 – Level the Walls
The first thing that you need to do is make sure that your wall is level. You can do this using a carpenter’s level so you know that you are accurate. If you find that the wall is uneven, you can even it out with a thin layer of drywall compound using the trowel so it goes on evenly. You can use the mud easel to put the compound on to make it easier.

Step 2 – Prepare the Walls
If your walls are located in an area that is prone to moisture, use the green board as a barrier since it is water resistant. Attach to the wall using the galvanized fasteners. Next you will need to make sure that your walls are clean and sanded. You need a rough surface for the backing of the tile so use the sandpaper for this step.

Step 3 –Seal the Joints
You will need to use joint compound to seal the joints between the boards and them use the fiberglass tape over top. Once that is done, you can then place a thin layer of the drywall compound over the boards. If your walls are in a dry zone, you can skip this step.

Step 4 – Place the Tiles
Now is the time to start placing the tiles on the wall. Measure your wall first to see if you are going to need any partial tiles and if so you will want them at the foot of the wall. To cut the tile, use the tile cutter. You can then remove the backing, place the tiles across the wall and use tow tile spacers so that you have expansion joints that are needed for the tiles. Start working from the bottom and work your way up. If you would like you can have a row of edging tile as a finish.

Step 5 – Remove the Spacers
Once all of the tiles are in place, you will then want to remove your tile spacers so that you can now grout the joints. Use the grout float for this. There may be some grout that is in excess on your tile and you can wipe that away using a damp sponge. If you think that your surface may be prone to getting wet, use some caulking between the tiles to protect the joints. Now you can wipe down the tile with a cloth that is lint free and then apply your grout sealant. Allow drying and then you are good to go.


Source: www.DoItYourself.com

You can get ceramic tile with art already on it, but you can also create your own works of ceramic tile art. The main problem you’ll find with ceramic tile art is that the paint can fade, wear off or simply run. This, of course, is if you do not take the time to seal the ceramic tile. Sealing ceramic tile art seems as if it should be easy, but you cannot seal it with the materials you find in stores for sealing ceramic. These chemicals include ingredients that are great to seal ceramic but will damage the artwork. Ceramic tiles are baked in a kiln in order to get the glazed look, but painted artwork does not have the same finish. The article that follows will show you not only how to seal ceramic tile art correctly but how to make your own sealer.

What You’ll Need

  • Mixing bowl
  • Linseed oil
  • Alcohol
  • Cotton swabs
  • Clean rags
  • Soft natural paintbrush

Step 1 – Make Sure the Art Is Dry
Before you even begin mixing up your home brew of ceramic tile art sealer, you need to make sure that the art is completely dry. If you try to apply the sealer to paint that is not completely dry, it will run or be wiped off the tile. It takes longer for paint to dry on ceramic tile than on most common painting surfaces, so take that into consideration. You also need to consider the humidity of the area you are working in. High levels of moisture will cause the paint not to set. Whatever the drying time is for the paint you are using, always double and even triple it to be certain it is set.

Step 2 – Using Alcohol
Alcohol is fast drying and can be used to set the paint on the ceramic tile just prior to applying the sealer. Alcohol can, however, damage paint, so it is important to test the alcohol on a very small area of the paint. Use a cotton swab to do this. If the paint dissolves, then use the alcohol very carefully. Otherwise, you can paint it on the tile as you would any other paint or sealer. Some kinds of paint can come off when you scrub it with alcohol. Prevent this by soaking a rag in alcohol and draping it over the tile. After several seconds, you can carefully remove the rag. The alcohol will dry in seconds and, in the process, will set and protect the paint.

Step 3 – Linseed oil
This type of oil is very safe on most paint products and also safe to use on glazed ceramic tile. Once the alcohol has dried, paint it on the tile over the art. Use a clean rag to dab up the oil but never scrub or wipe it off.

Step 4 – Make a Sealer
If this is a hobby you do often, then mixing your own sealer will prove beneficial. In a mixing bowl, pour in four parts of linseed oil. Thin the oil out with one part alcohol.


Source: www.DoItYourself.com

A floating floor can really spice up any kind of home design. Some even serve multi-purposes such as a small stage for live performances and the likes. However the floor will be used, it is necessary that the area where the floating floor would be installed first be inspected.

Ideal Locations for Floating Floors
Ideally, a floating floor must be installed in a sturdy and even space. If this is not the case in your set-up, you should search for ways to improve the location of your floating floor.

Preparations in Correcting Uneven Surfaces for Floating Floor
Decide on the space where you would be putting up your floating floor. If you are considering using wood, make sure that the area you would choose would be safe for such materials. As such, laying a wooden floating floor on soil would need more considerations to ensure the protection of the wood.

Measure the area to ascertain what materials you would be using. If you are laying floating floor on the ground, considering having dips filled up with soil. You could also have rising areas plowed prior to the installation of your floating floor.

Sanding and Filling
For concrete and other similar sub-floors or grounds, it might be best to allot a budget for sanding and filling. Get a level to determine the areas which you need to level. Evenly sand those areas that are a lot higher than the rest of the surface. Dust off all debris before measuring it up using your level. For dips, get concrete putty or other similar filler. Apply this to areas that need fillings. Let it dry completely before measuring it again. Sand the fills that has risen to more than the desire level

Installing a floating floor on an uneven surface could also be achieved by skipping all the above-mentioned steps. However, the task at hand would be trickier. Thoroughly clean the area where you would be building the floating floor. After that, measure the areas where there are depressions and rises. The “legs” of your floating floor should be made to fit such sections.

In this regard, you need to measure up each of the fills and rise to be able to adjust the sizes of your floating floor’s legs. Measuring and wood cutting are the most important steps here. Any miscalculation could lead you to the misfit of the floating floor’s legs to the surface. Also, remember that the materials you would be using for the floating floor’s legs should be the sturdiest. These parts are like foundations that would be tasked to carry most of the pressure to the floating floor.

After all the adjustments have been done, continue on attaching the floor boards of your floating floor. Drive down nails and screws next to each other to stop the boards from squeaking. Also, double check for surface impurities that would need sanding. Hammer down each nail to ensure that they don’t come loose. Apply varnish and paint as desired.


Source: www.DoItYourself.com

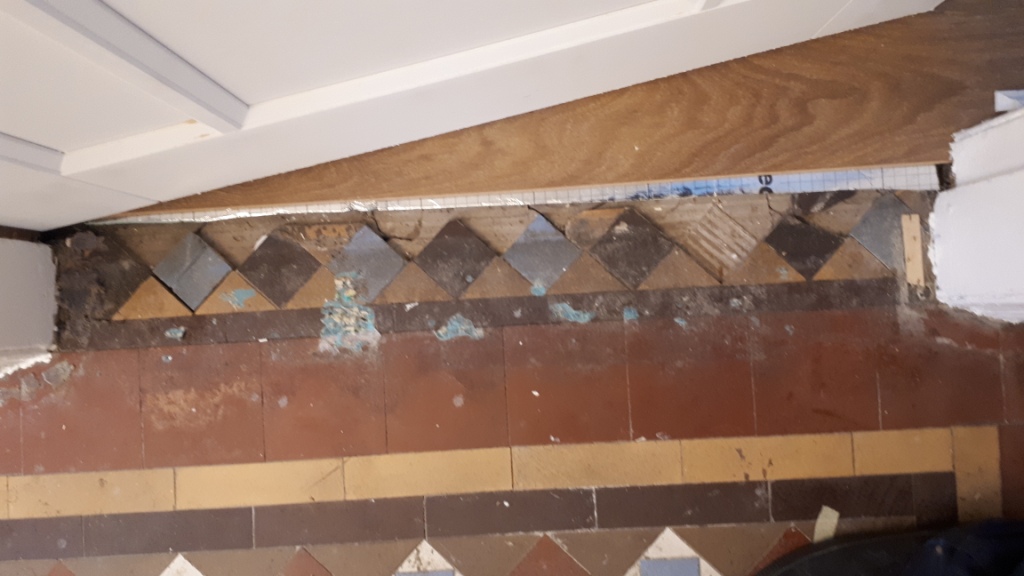
This client had recently discovered a Victorian tiled floor hidden underneath hallway carpet at their property in the Birmingham suburb of Bournville. It didn’t look in great condition as some areas were missing and staining from carpet adhesive, but it was a beautiful patterned floor tiled potentially with Minton tiles and they were really keen to find out if it could be restored to its’ former glory.

The rest of the property in Bourneville had retained its’ original features so the floor would be the icing on the cake.

Victorian Tiled Floor Before Restoration Bourneville

I went along to survey the floor, provide a quote and perform a small cleaning demonstration so I they could get an idea of the results they could expect. The damaged areas were repairable and once I had completed the test clean, we were confident the floor could be restored. They were happy to proceed with my quote and the job was booked in.

Victorian Tiled Floor Before Restoration Bourneville Victorian Tiled Floor Before Restoration Bourneville

Bourneville is the home of the chocolate makers Cadbury, so many people will have visited and been aware of the area. Many of the houses were built for the workers at the Cadbury factory.

Repairing a Victorian Tiled Hallway Floor

On the first day I started on relaying the three internal door thresholds with some existing tiles and matching replacements that I had managed to source online. We are usually able to source reclaimed tiles and reproduction ones, so repairs are not usually a problem. It took some time to clean out the old adhesive, cut the replacement tiles to size where required and then then fix in place with fresh adhesive.

Victorian Tiled Door Threshold Before Restoration Bourneville Victorian Tiled Door Threshold Before Restoration Bourneville Victorian Tiled Door Threshold During Restoration Bourneville

The next job was to replace some broken ones along the edges and some in the main part of the floor which had been drilled in to. These can be tricky to do as they can easily break adjoining tiles. When this was done the tiles were grouted and the other loose ones reset. It’s meticulous work and the tile adhesive needs time to set before the next stage which would be giving the entire floor a deep clean.

Victorian Tiled Floor Before Restoration Bourneville

Deep Cleaning a Victorian Tiled Hallway Floor

The following day I focused on deep cleaning the tiles starting with the removal of the strong adhesive that had secured the carpet gripper. This had to be removed by applying a neat Tile Doctor Pro-Clean and leaving it to dwell for ten minutes. The Pro-Clean helped loosen the glue which was then carefully scraped off.

The floor was then mopped with a strong dilution of Pro-Clean before running over the tiles with a 200-grit diamond pad fitted to a rotary machine. This combination gets into the pores of the tile, releasing the dirt and renovating the surface. The resultant slurry was then rinsed off with water and extracted using a wet vacuum.

Next, the floor was given an acid rinse using Tile Doctor Grout Clean-Up worked in with a 400-grit burnishing pad to further clean up the tiles and close-up the pores. The floor was rinsed and extracted again and allowed to dry for two nights.

Sealing a Victorian Tiled Hallway Floor

On my return I tested the floor was dry with the damp meter and satisfied myself that the floor was dry and ready to accept a sealer which would enhance its appearance and protect it going forward.

My sealer of choice was Tile Doctor Seal and Go Extra which adds a nice subtle sheen to the floor and being breathable will cope with any potential moisture rising through the tiles. This is an important consideration on old floors like this where no damp proof membrane will have been fitted.

Victorian Tiled Floor After Restoration Bourneville Victorian Tiled Floor After Restoration Bourneville

By the time I had finished the floor was transformed and had become the main focal point of the house. My clients were very pleased with the new entrance to their home and before leaving we discussed after care for which I left them with a complementary bottle of Neutral Tile Cleaner.

Victorian Tiled Door Threshold After Restoration Bourneville


Source: Minton Floor Cleaning and Restoration Service in Birmingham

Joist hangers strengthen a floor because without them, there would be no floor to support. Floor joists are the lengths of 2-by-6-, 2-by-8- or 2-by-10-inch lumber. They run horizontally and provide the support for subflooring, flooring and everything that rest atop the floor. In other words, they provide support for weight that is focused solely downward. Floor joist hangers, in turn, support and enable floor joists to stay in place.

Joist hangers are metal fixtures that attach to horizontal beams and rims of a building’s frame. They provide a cradle for the joist to fit into. Each joist is supported by a hanger at either end. The joist hangers themselves are affixed to a beam or rim joist with tico nails, extra-wide nails designed for sheer weight. The joists are then affixed to the joist hangers with the same nails. Screws or 16d nails are never used.

Without joist hangers, joists would eventually give way under the weight. In some instances, joists are doubled or tripled and attached to a corresponding joist hanger to add even more support.


Source: www.DoItYourself.com