Archive

Monthly Archives: January 2024

The customer at this 200-year-old property near Greystoke asked if we could do anything for their old Stone floor as a new Kitchen was to be fitted and a decision had to be made to either rip up the old floor or have it restored.
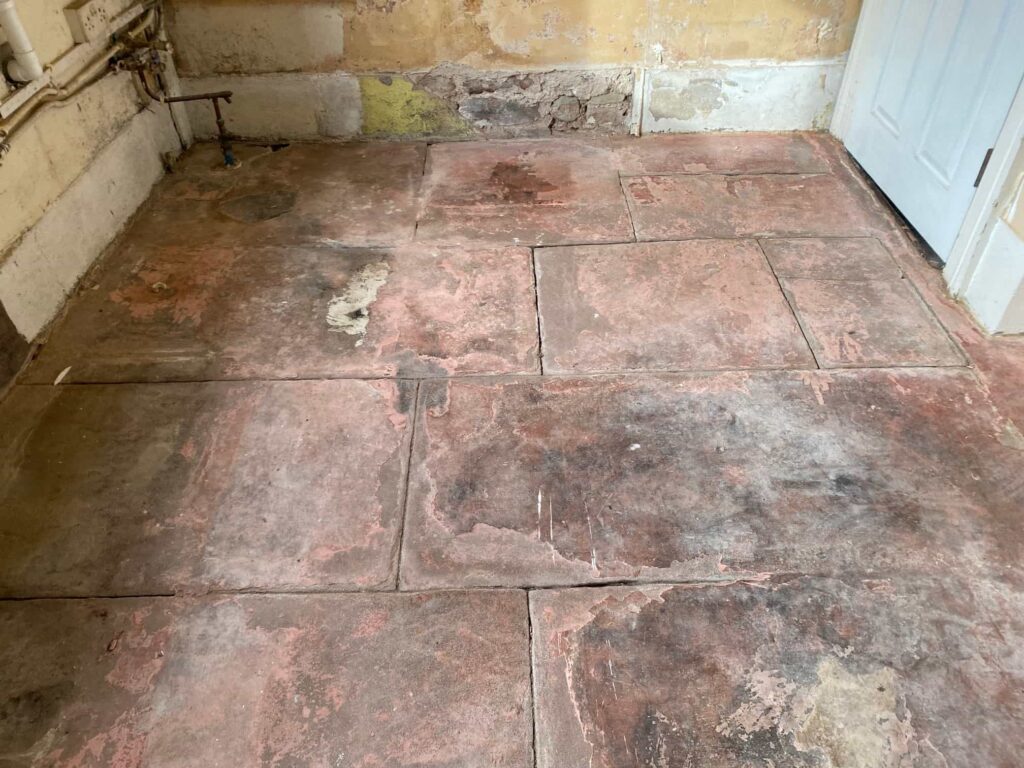
Aldous Red Sandstone Floor Before Renovation Greystoke

The stone was Aldous Red Sandstone which if you have read our website is something we are quite familiar with. One thing we have learned from restoring these floors over the years is that they are very forgiving and the best way to renovate them is to grind off the old and often badly stained surface. We call this process Milling and it involves applying different grades of coarse diamond pads, the result is a fresh new surface that smoother and much easier to maintain. We can also re-point the mortar which is often past its best on these old stone floors.

Having discussed my recommendation, they agreed to go ahead, and we set a date in the diary for the work to start.

Milling Aldous Red Sandstone

Milling involves the application of several coarse grades of hard diamond pads to the stone using water to lubricate the process, the water also helps make the removal of the soil easier and reduces dust. I followed our usual method of starting with a very coarse 50-grit pad and then moved up to 100 and then 200-grit milling pads rinsing and extracting the soiling in-between each pad with a wet vacuum. These 17-inch pads fit a rotary floor buffer that has weight added to ensure maximum traction between the pad and the stone floor.

Once done the next step was to rake out the loose mortar between the slabs, cleanup the area and then repoint with a breathable pointing mix in Light Grey. That was left to set and the floor was given a light clean with Tile Doctor Pro-Clean to remove any dust and get it ready for sealing.

Sealing a Red Sandstone Tiled Floor

We returned the following day and checked the floor was dry using the moisture meter, we don’t recommend applying a sealer to a damp floor as the sealer will not cure properly. All was well, so we then applied Tile Doctor X-Tra Seal which is an oil based Breathable Colour enhancing sealer.

Using a breathable sealer on old stone floors like this is highly recommend as these floors rarely have a damp proof membrane installed and so it’s important to give moisture a way of rising through the floor naturally and evaporating rather than being trapped under the floor where it can eventually build up in the walls.

You can see from the photos that the work was transformational and have added new life to a 200-year-old floor which I’m sure will look even more stunning once the new kitchen has been fitted.
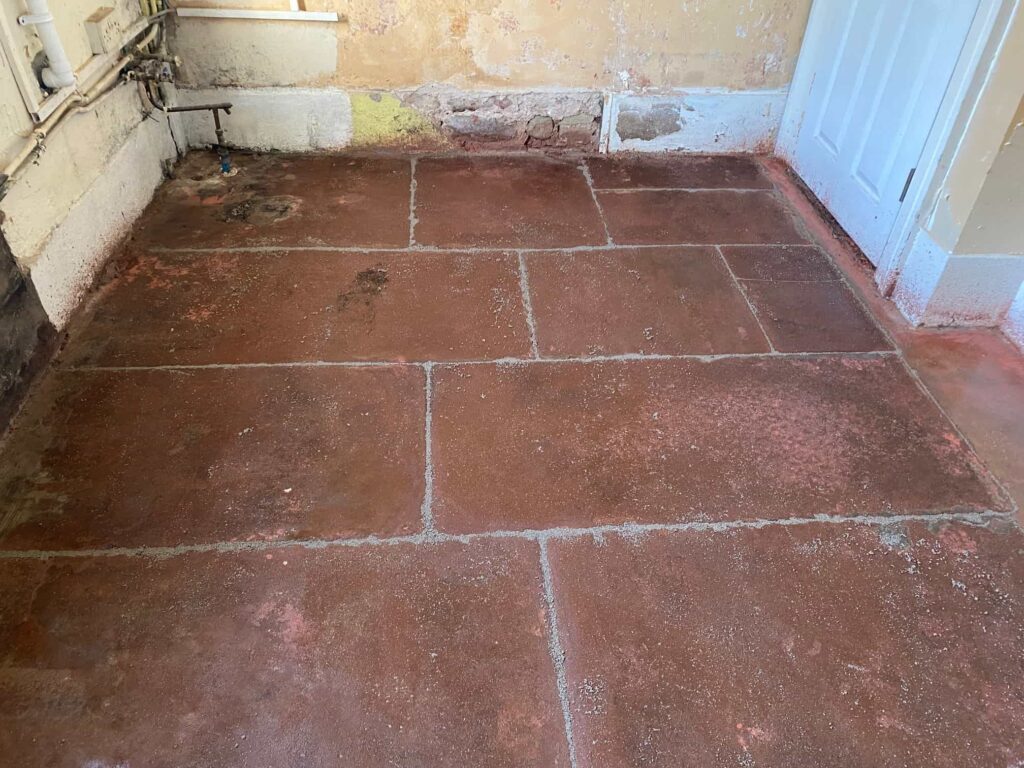
Aldous Red Sandstone Floor After Renovation Greystoke

For aftercare cleaning of a sealed floor, we recommend the use of Tile Doctor Neutral Tile Cleaner, it’s a mild but effective cleaning product that won’t impact the sealer.

Source: Stone Floor Cleaning and Restoration Service in Greystoke Cumbria

Vinyl tiling is a very versatile covering for floors, walls, countertops, and anything else you want to be able to clean easily. Most of the time, vinyl covering is found on bathroom floors. However, this peel and stick type of covering can also be used to decorate and finish off the bathroom walls. This type of vinyl is not only very easy to clean, but also comes in a wide variety of colors, designs, and shapes. With an almost unending supply of designs, you are sure to find an exact match for your home. Here are some steps to take in applying vinyl tiling to your bathroom walls.

What You’ll Need:

  • Vinyl tile
  •  Tile adhesive
  •  Rubber roller
  •  Utility knife
  •  Tape measure
  •  Chalk line
  •  Bucket
  •  Water
  •  Detergent

Clean Wall

The first step to covering your walls with vinyl tiling is to clean them as thoroughly as you can. This is the most important part of the entire process. If there is any type of dirt, debris, or residue from another wall covering the adhesive will not stick very well and there will be little bumps throughout the vinyl tiling. To clean the wall use a mild detergent with warm water. Wipe the wall with a sponge and then dry with a clean rag or towel.

Find the Center of The Wall

Once the wall has been cleaned of any type of dirt and debris you can begin to lay out the vinyl tiling for your bathroom wall. To do that you need to find the center point of the wall. Measure both the height and the width of the wall in order to find this location. Snap a chalk line for both the vertical and horizontal directions. By doing this you are making sure that you use more full pieces of vinyl tiling.

Set First Tiles

Vinyl tiling is very easy to stick onto a wall. Most types of vinyl tiling have peel-and-stick backing, but will still require that some adhesive be applied. Start at the center of the wall. This is where you will stick four pieces of vinyl tiling along each of the axis points. Spread a thin layer of adhesive with a notched trowel, then peel off the backing of the vinyl and position it in place. Do this with all four pieces.

Continue Setting Vinyl Tiling

With the first parts in place, use a level to ensure they are running in a straight line, along with both the horizontal and vertical points. Continue setting the tiles in the same method until you get to the wall area where some trimming will be needed.

Trim Vinyl Tiling

Once you get to the edge of the wall you will need to do a little bit of trimming of the vinyl tiling to make them fit. Set a tile on the wall in position and mark where it needs to be cut. You can also measure the opening and then transfer it to the tile. Use a utility knife to make the cut. Set the tile on the wall.

Roll Out Vinyl Tiling

Place a rubber roller on the tiling and make sure that they all make contact with the adhesive.

Source: www.DoItYourself.com

Self-leveling compound is generally used as an easy way to smooth out the rough surface of concrete or gypsum. If you have a different type of floor or under-floor heating coils, make sure the compound is compatible. Self-leveling compound allows an unobstructed installation for tile, carpet, vinyl and even hardwood. It is not intended to fill in or lengthen the floor. There a several basic self-leveling compounds available; water-based self-leveling compound is the most common.

Step 1 – Consider Where to Use

You should not attempt to use self-leveling compound for leveling a floor that has a slope due to settling. Raising a one inch or more slope with self-leveling compound will cause problems. Some of these problems may include a tripping hazard or issues with opening and closing closet doors in the area. The purpose of the compound is to smooth a surface and raise minor flaws where needed. The rise should be no more than five millimeters.

Step 2 – Understand Consistency

It can be a bit challenging to get the right consistency with self leveling compound. The most common terms to describe the correct consistency of the mixture range from “pea soup” to “a thin milkshake”. Depending upon whether you are a vegetarian or a dessert lover, these descriptions can give you an accurate visual.

Step 3 – Mix

Read the manufacturer’s instructions and follow their recommendations for mixing. In most cases you will measure the correct amount of clear water, approximately 1 1/4 gallons. Then add the corresponding amount of powder, approximately half the bag. You should make only the amount of compound you can use in approximately 20 minutes. Add the powder slowly while stirring. The most precise way to stir the mixture is to use a drill with a paddle attachment. You can control the speed more accurately than mixing by hand. Mix for at least two minutes, scraping the sides and bottom with a paint stir stick if necessary. If the consistency reminds you of cookie dough you will need to add water to thin it. You are looking for a thick liquid you can easily pour without it running.

Step 4 – Apply

Locate the lowest point of the floor. You will start here allowing the mixture to puddle. If there are several lower points on the floor, pour an amount equal to a puddle on each point. Once the puddle area is no longer moving, feather that area using a flat trowel.

Pour only an amount equal to the length of your reach. You will need to spread the mixture after you pour it. If it moves too quickly the consistency is too thin. If it does not move at all, the consistency is too thick. In most cases the error is to make the consistency too thin. Do not use mixture that has been sitting more than 20 minutes in the bucket.

Step 5 – Apply a Second Coat

Drying time is generally two hours depending on the heat and humidity. The manufacturer will give you a recommended drying time between coats. Use the same consistency for any follow up coats of self-leveling compound.

Source: www.DoItYourself.com

Even without prior experience, you can learn to install outdoor carpet on concrete porch steps. Be prepared to spend most of your time preparing the concrete, collecting material and tools, and buying your carpet. Compared to the time it takes to do all that, installing the carpet will be a snap. Just follow the steps below to get the entire project finished inside one weekend.

What You’ll Need:

  • Cement
  •  Water
  •  Carpet shears
  •  Tape measure
  •  Electric grinder
  •  Safety goggles
  •  Outdoor carpet
  •  Carpet adhesive
  •  Notched adhesive spreader
  •  Utility knife
  •  Straightedge
  •  Adhesive solvent

Step 1 – Prepare the Concrete Surface

If your steps have been painted, remove any peeling or cracked paint with a putty knife or grinder. Sweep off all dirt and paint debris. If there are oil or grease stains remove them with solvent or muriatic acid, then use a stiff bristle brush and scrub with a mixture of hot water and detergent. Next, rinse off with your garden hose, and let the concrete surface dry. If it has cracks, holes, or chips, be sure these are thoroughly dry. Remove any loose chips, dirt, or debris in these indentations. Apply concrete patching primer, and when the primer is dry, fill the indentations with concrete repair filler. When this is dry, use a electric grinder to level the surface of the dried filler with that of the concrete.

Step 2 – Cut Your Carpet to Fit the Steps

Measure the width of the steps and of the carpet. If the carpet is wider than the steps use your straightedge and utility knife to cut a strip of carpet about 2″ wider than the width of the steps. If the steps are wider than your carpet you’ll need two strips that, when laid side by side, are 2″ wider than the steps.

Step 3 – Apply Carpet Adhesive

Starting at the top and back of your steps and working your way across the top surface of the porch or step, begin applying carpet adhesive onto small areas of the step surface. Use a notched adhesive spreader and spread the adhesive on to the horizontal and vertical surfaces of the step on which you will glue your carpet. Be sure the adhesive is spread to the far edges of the step, so that there are no excessive pools of adhesive or air bubbles left under the carpet.

Step 3 – Lay Your Carpet

Lay the edge of your carpet against the vertical back surface of your porch or top step. Begin unrolling your carpet, 12″ to 15″ at a time. Be sure you have about one inch of spare carpet at either side of the stairs. Starting at the center of the carpet, press it down against the adhesive, smoothing it flat as you work toward the left and right edges. When you reach the bottom step, use your utility knife to cut off the spare carpet that is left over. Finally, use a pair of carpet shears to trim off the edges of the carpet at the left and right sides of the steps.

Step 4 – Allow Drying Time

Let your adhesive dry for at least 12 hours before walking on it.

Source www.DoItYourself.com

Berber Carpet is a low pile carpet, meaning it is fairly dense and is woven tightly together. It is a very popular choice for carpet material because of its resistance to stain, its ability to withstand high amounts of foot traffic, and its diversity in colors, style, and overall appearance. Berber carpet comes in wool, nylon, olefin, and several combinations of the aforementioned materials. Like any other carpet, Berber carpet can and will develop depressions from things such as heavy pieces of furniture. While some depressions may be permanent, below you will find a how to list for getting rid of the majority of indents in your Berber Carpeting. Note that it may take several attempts before you get rid of your Berber carpet depressions.

What You’ll Need:

  • Ice cubes
  •  Hair dryer
  •  Spoon
  •  Misting spray bottle (with trigger) filled with warm water
  •  Steam iron

Step 1 – Remove Heavy Objects from the Carpet

Rearrange your room often. Remove the heavy objects from the Berber carpet or slide them to a new location. Allow your carpet to breathe for at least three to four days. Alternatively, you may use furniture glides or cups underneath the legs of the lighter furniture to reduce indents in the first place.

Step 2 – Work with Fingers

When the indents to occur, help the carpet fibers fluff back up. Work the carpet pile back into place with your fingertips. Allow it to sit for 24 to 48 hours.

Step 3 – Use Ice

If the dent perseveres, try to chill it. Fill a Ziploc bag with several chunks of ice. Break the ice up into smaller pieces. Place the bag on the indented section of your Berber carpet. Allow the ice to melt, and remove the plastic bag from the carpet. Then use a stiff brush or a vacuum cleaner to restore the carpet to its original form and shape.

Step 4 – Use a Spoon and Heat

If an indentation remains at this point, use a spoon to further remove the indentation. The back of the spoon can help re-stretch the Berber carpet back into place. After smoothing the lines and indents with the spoon, dampen the area with spray from a water misting bottle (spray bottle). Do not over moisten. Heat the area with a dryer and work with the same spoon while heating the area with the hair dryer. The heat will help give the carpet fibers some extra play and give. The carpet fibers will become more malleable and receptive to the movement of the spoon and your fingers. Please note that if your Berber carpet is mainly made from Olefin, or a true synthetic fiber do not overhead the carpet. The Berber may begin to melt and emit a foul odor.

Step 5 – Use a Steam Iron

Still see a Berber carpet depression? Try using a steam iron. Heat the steam iron on high steam and high temperature. Iron over (gently) the depressed area of your carpet for up to two minutes. Let the carpet rest for twenty-four hours. Your depressions will disappear and the carpet will come up just like new. Please remember, if your Berber carpet is not wool, you risk developing burn spots and melted sections from the high heat of the steam iron.

Source: www.DoItYourself.com