Archive

Monthly Archives: August 2022

This client has lived in the same Woking property for thirty years and had recently decided to lift the linoleum by the back door to the property. Underneath was a small rectangle of Quarry tiles and the decision was made to lift all the lino and see what could be done to restore the original floor.

Quarry Tiled Floor Before Renovation Woking

My job was to fully remove the linoleum and adhesive, paint splashes and to seal the floor in what was a high traffic area. Although small, I was aware there would probably be a lot of adhesives to remove, and the tiles may be damaged underneath.

I’ve been a Tile Doctor for many years and if you look at my website, you will see I’ve tackled all sorts of Tile, Stone, and Grout situations. So confident I could restore the floor to their satisfaction and optimistic that the job would not take too long I provided a quote for the work which they were happy to accept, and a date was scheduled for my return.

Cleaning a Quarry Tiled Hallway Floor

The first task was to protect the surrounding skirting boards and door; then a strong dilution of Tile Doctor Remove and Go was applied and left to dwell for 20 minutes. This product is a strong alkaline coatings remover designed for use on Tile that breaks down adhesives and other coatings such as paint spots and sealers. Using a coarse 100-grit diamond pad fitted to a rotary buffer machine I set about scrubbing the adhesives from the surface of the Quarry tile.

This is an effective method that not only removes the glue but also cleans up the tile taking away what was probably thirty years of ingrained dirt in the process. Once done the glue and soiling was rinsed and extracted. Stubborn areas and corners were treated by hand using a 60-grit diamond block until I was satisfied the whole floor was as clean as it could be.

Sealing a Quarry Tiled Hallway Floor

As we were in the middle of the July heatwave, I was able to dry the tiles quickly, and is it was a small area there was no need to leave the floor to dry off overnight. Wet tiles mustn’t be sealed as the seal will not cure so before moving onto the next step, I took several moisture readings with a damp meter. The floor was soon within acceptable range, so I was able to apply the sealer later that afternoon.

As it was an old house and a high traffic area, I suggested sealing the floor with Tile Doctor Seal and Go Extra. This offers a very strong seal with a nice sheen. It’s not too shiny for an elderly house and will last years, it’s also breathable which is an important consideration when sealing old floors that don’t have a damp proof membrane. I applied two coats, letting them dry in-between.

Quarry Tiled Floor After Renovation WokingMy client was over the moon with the transformation and very pleased to see the back of the linoleum floor which really had seen better days. A light mop using Tile Doctor Neutral Tile Cleaner would ensure the nice sheen would stay put and the rich colour of the quarry tiles would be maintained. Tile Doctor Neutral Tile Cleaner is pH neutral so it is not harsh on the floor and will not damage the newly applied seal, like stronger household cleaners might.

Source: Floor Tile Floor Renovation Contractor in Surrey

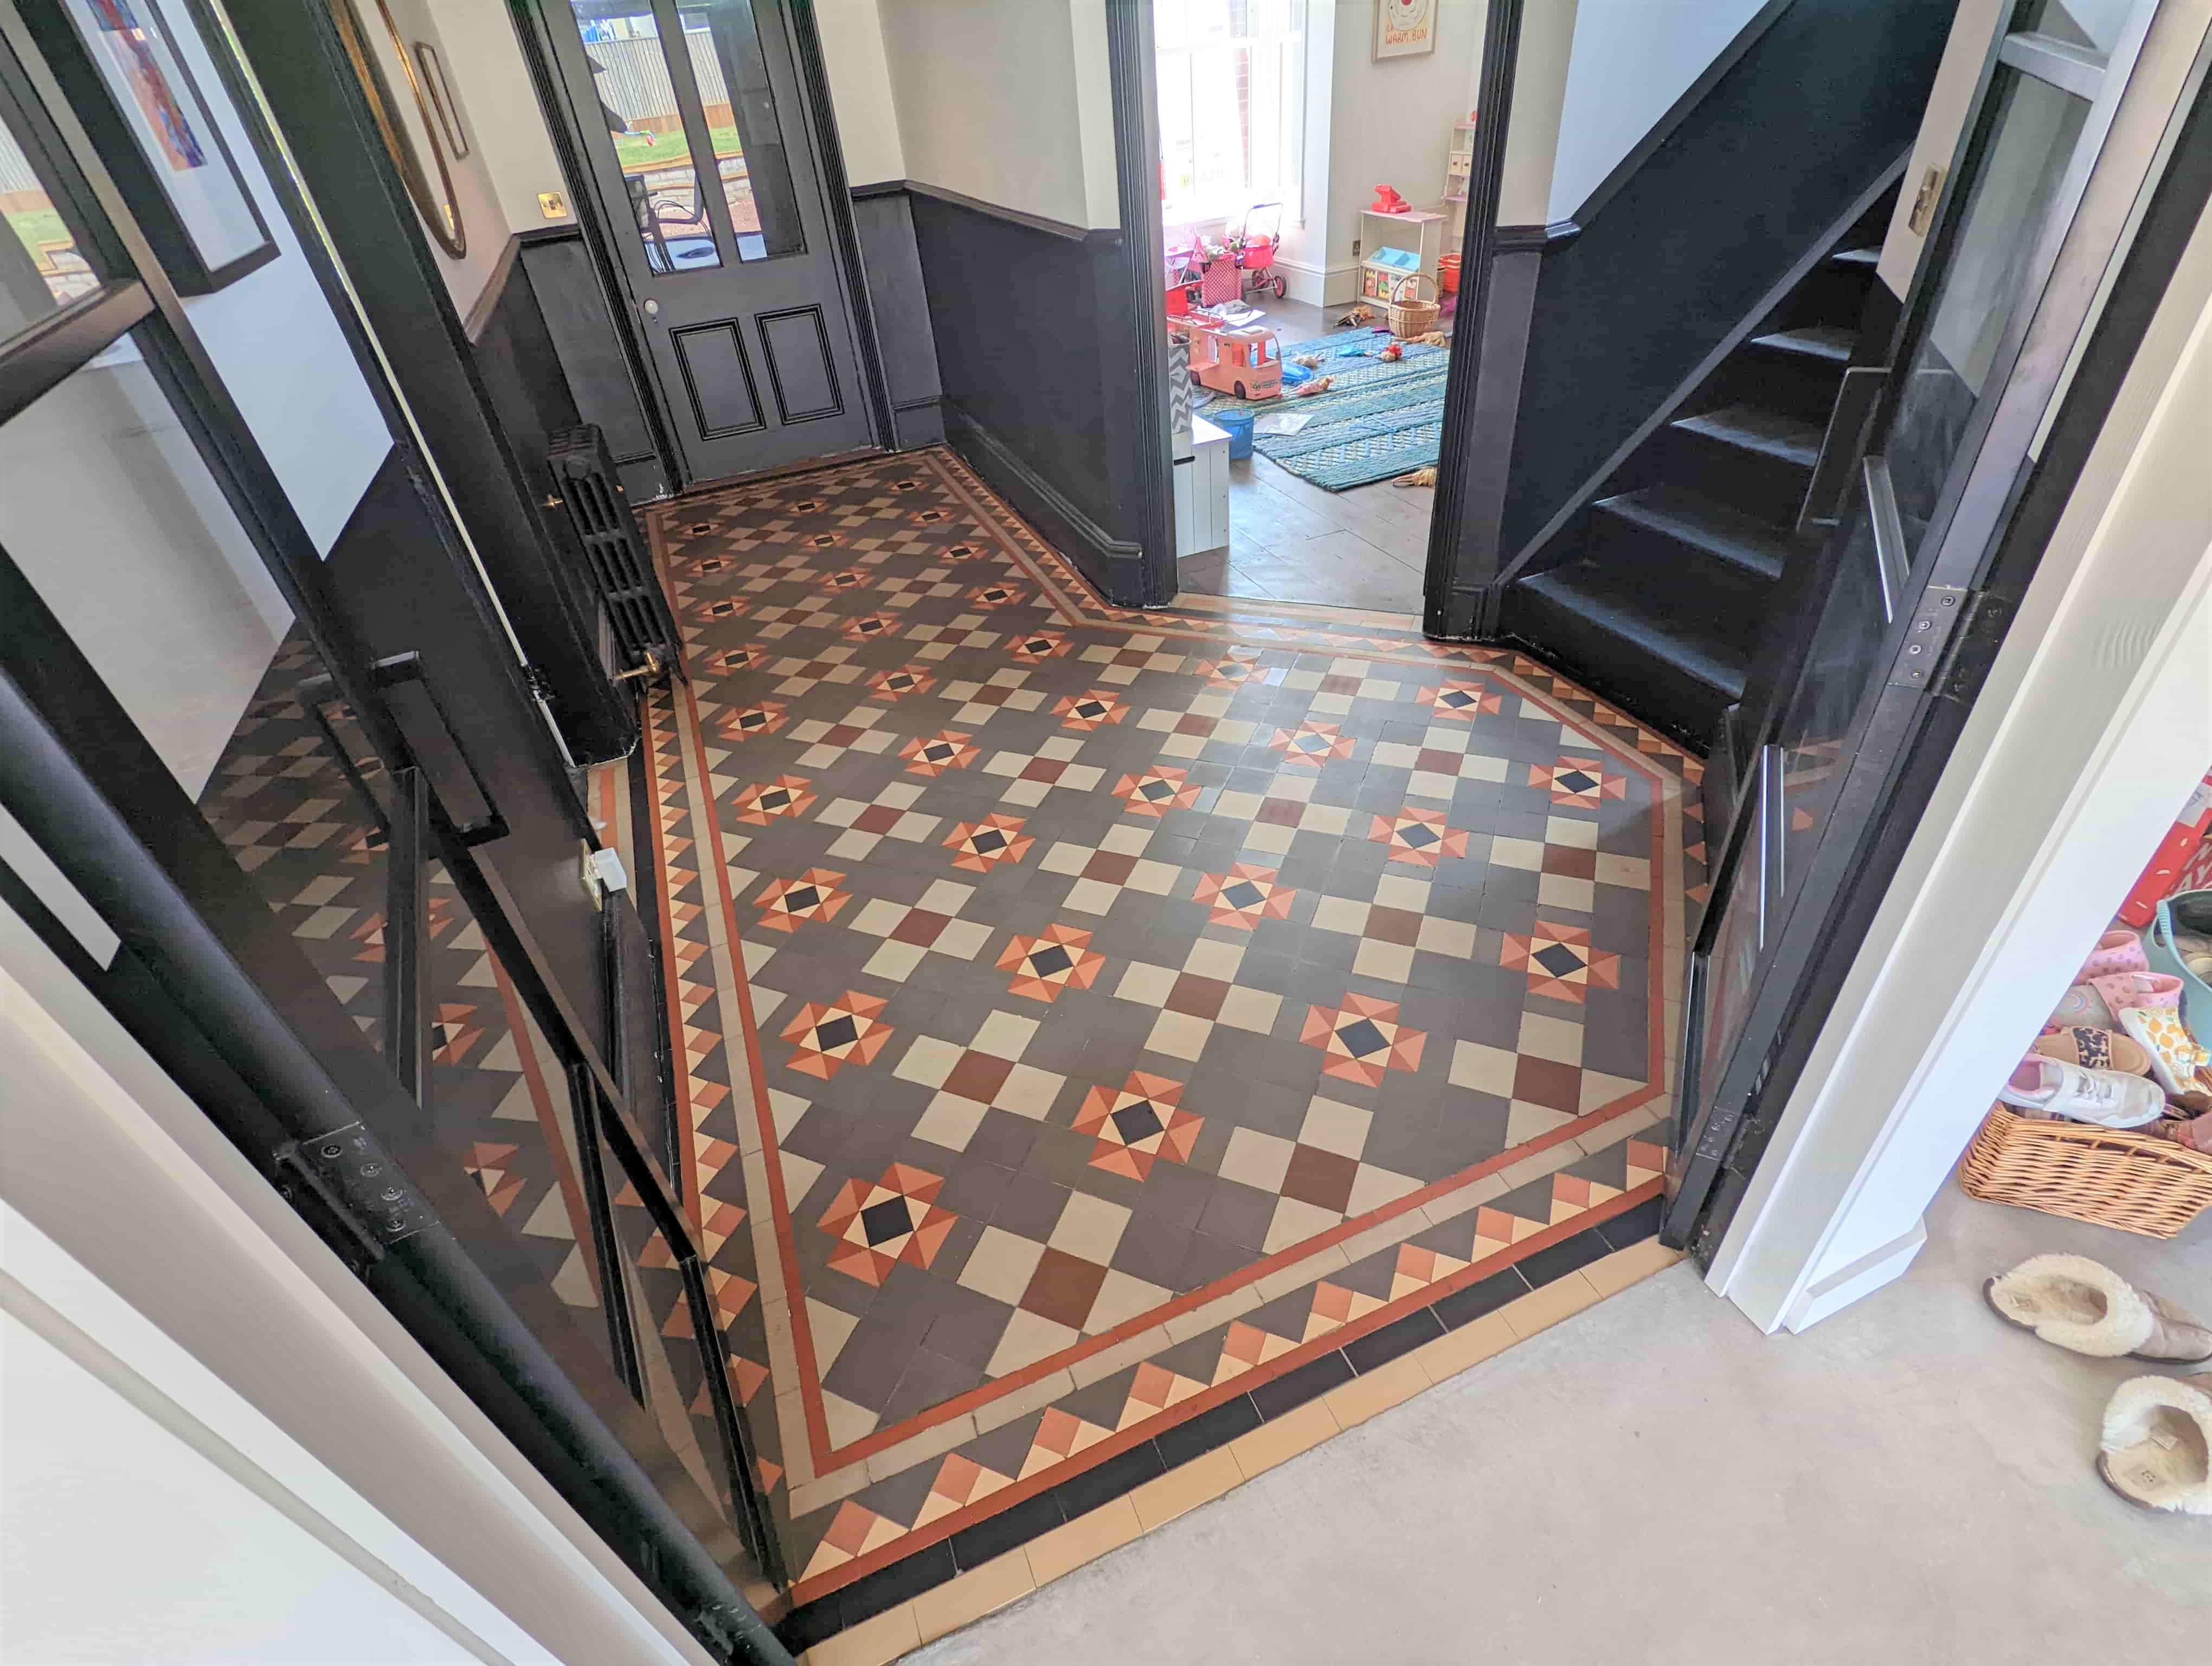
A couple in Exeter were nearing the end to their extensive house renovation and called me in to see what could be done to their Victorian tiled hallway. The previous workmen had managed to tread all sorts of building materials into the tiles, however I assured them all was not lost and that it would certainly be possible to put the life back into the floor and turn it into an eye-catching original hallmark feature once more.

After the initial free home survey, I issued them with a quote which they were happy with and they booked me straight in to complete the renovation. If your having work done to your property, I would agree it makes sense to renovate the flooring last but it will help if you protect the flooring as well.

Cleaning/Repairing a Victorian Tiled Hallway Floor

I started the process by taping and protecting around their freshly decorated areas and custom fitted radiators. Tile Doctor Product Remove & Go was then diluted and applied to the floor and allowed to sit and dwell for a good 20 minutes. I then introduced my rotary machine with a 200-grit diamond pad to work off the stubborn surface debris, the left-over paint and cement stains. I repeated the process in some areas where the staining was particularly bad. The floor was rinsed each time and the waste was extracted with a wet vacuum.

Victorian Tiled Hallway During Renovation Exeter

A good deal of hand-block work was required around the perimeters where messy decorators had left their mark in the past. With the tile pores still open after the 200-grit pad I applied a Tile Doctor Acid Gel wash to the floor and let the product sit for half an hour before removing with the vacuum and taking any remaining excess product off with a damp cloth.

Victorian Tiled Hallway During Renovation Exeter

The next day I installed a course of tiles at the top end which they wanted fitting to tie in level with their freshly poured polished concrete kitchen floor. I had to build up a substrate first on top of the damp proof membrane already in place before cutting and fitting the tiles and grouting. Using quick set adhesive and grout meant these were soon dry, but they were still left overnight to set ahead of the final step of applying the sealer.

Sealing a Victorian Tiled Hallway Floor

Returning on the final day, the first job was to test that the floor was dry using a damp meter. Once satisfied the day was spent applying two coats of Tile Doctor X-Tra Seal which reinstated the vibrant colours and put the life back into the original Victorian Tiles. This is a modern breathable sealer which is oil based. It provides great protection from water and staining whilst leaving a nice subtle sheen.

Victorian Tiled Hallway After Renovation Exeter

The clients were over the moon with the job and thanked me for bringing back to life this lovely feature of their period home. It was important for them to keep the balance between new and old in this modern renovation on their Victorian home. The hallway was now a lovely welcoming area.

For aftercare cleaning of sealed Victorian tiles, I recommend using Tile Doctor Neutral Cleaner. It’s a mild tile and grout cleaning product that won’t prematurely erode the lift of the sealer, many supermarket brands are simply too strong for use on sealed tiles.

Victorian Tiled Hallway After Renovation Exeter

Source: Victorian Tile Cleaning and Renovation Service in Devon

Ensuring that concrete flooring is level is critical when you wish to apply floor coverings such as carpet, wood planking, and tile over it. Follow these guidelines to level a slab of concrete flooring inside a room of an existing building, prior to laying a new interior floor.

What You’ll Need:

  • Heavy-duty broom and dust tray
  • Shop-vac style vacuum cleaner
  • Carpenter’s framing square, and 2 long pieces of straight wood planking
  • Permanent marker or sidewalk chalk
  • Floor polisher
  • Coarse grit sandpaper
  • Power concrete sander
  • Mop and bucket of water
  • Concrete floor leveling mixture
  • Steel or aluminum bucket
  • Pointed flat trowel or broad putty blade
  • Eye protection
  • Steel toed footwear and gloves

Step 1 – Empty and Clean the Concrete Floor Area

Remove all furniture, vehicles, boxes, rugs, and other items from the entire area of the concrete floor to be leveled. Sweep the floor area with a heavy-duty broom, picking up dust, hair, and other debris. Vacuum the area well with a heavy-duty shop-vac style vacuum cleaner. Go over the entire floor with a polisher with coarse grit sandpaper attached to the rotating heads, and then vacuum once more to remove the concrete dust.

Step 2 – Find the High and Low Spots in the Concrete Floor

Use a carpenter’s framing square and two long pieces of wood planking that you have checked are straight to examine the floor for high and low spots. Mark the high spots with a series of arrows or zigzag lines with a marker or sidewalk chalk. Mark low spots by drawing a series of circles from the outside rim inward to the center.

Step 3 – Grind Down Bumps in the Floor Surface

Obtain a concrete sander on a short-term rental from a building supply center. Use the largest one available to grind down large bumps in the floor surface. Open all the doors and windows enclosing the space where you are grinding. Move the concrete sander slowly and carefully to avoid creating pits in the floor.

Step 4 – Clean and Vacuum the Floor Again

Vacuum the floor surface again, and give it a quick damp-mop with water only to remove any traces of concrete dust. Allow the floor time to dry completely before proceeding.

Step 5 – Prepare the Concrete Floor Leveling Mixture

In a steel or aluminum bucket, prepare the concrete floor leveling mixture according to the instructions. Mix just a small amount each time, as it cures and dries quickly. Fill the low spots in the floor with the mixture, and draw the trowel or wood plank over it to ensure the top edge is level with the rest of the floor. Let the mixture set for 30 minutes then smooth the top edge of the fill spot with the trowel or broad putty knife.

Step 6 – Recheck the Floor After Leveling

Check the success of your leveling operation with the carpenter’s framing square and straight planks. Mark and fix any unsatisfactory areas.

Step 7 – Polish the Concrete Floor

Go over the entire floor once more with fine-grit sandpaper, 220 or 300, on the floor polisher. Vacuum the floor again and mop it, ensuring no loose concrete grit or dust remains.

Source: www.DoItYourself.com

The owner of this tired and unloved Victorian Tiled Hallway in Sheffield was unhappy with its appearance and decided it was time to have it restored and looked at its best again. As well as renovating the appearance of the floor there was also a damaged area that needed pulling out and re-tiling to match.Victorian Tiled Hallway Floor Before Restoration in Sheffield

The property and tiling dated back to the 1890’s and hadn’t been maintained in a long time; it is typical of a lot of property in the area which sprung up in the 1890s. At the time the city of Sheffield was devoted to work with chimneys dominating the skyline and population approaching 400,000 and rising rapidly. It pulled in workers from all around and was a time of great change as medieval street layouts were widened to accommodate trams and other vehicles

I visited the property to survey the floor and provide an accurate quote for doing the work. I could see there was an old sealer present on the tiles however this was now worn thin in places and was well overdue for replacement. Also, because it wasn’t a breathable sealer it was trapping moisture in the tiles which resulted in efflorescent white staining. Victorian Tiled Hallway Floor Before Restoration in Sheffield

Efflorescence is often a problem on these old floors which don’t have a damp proof membrane to prevent moisture rising through the floor. It’s best to allow the floor to breath so moisture can evaporate at the surface, if it becomes trapped it can pool and reach out to the walls resulting in rising damp.

I worked out a plan to strip off what was left of the old sealer, clean the tiles, deal with the efflorescent staining, repair the broken tiles and finally seal the floor with a breathable sealer. My quote was accepted and a date agreed for the work to being.

Repairing a Victorian Tiled Floor

The first job was to repair the areas of damage using replica tiles that I had managed to source the week before. There are several companies you can go to for replicas and these were chosen for their matching colour.Victorian Tiled Hallway Floor During Repair Restoration in Sheffield

The loose and cracked tiles were carefully removed and cleared away, then the replicas were cut to fit the empty gap and once I was happy, they were laid in place with a flexible adhesive which would allow for some movement.

Deep Cleaning a Victorian Tiled Hallway Floor

To strip off what was left of the old sealer the tiles were sprayed with a dilution of Tile Doctor Remove and Go, this is a strong treatment that breaks down floor coatings. After ten minutes a rotary machine fitted with a very coarse 200-grit diamond pad was run over the floor to work the remove and go into the floor. Victorian Tiled Hallway Floor During Repair Restoration in Sheffield

The slurry generated was then removed with a wet vacuum and the tiles inspected and any stubborn areas which were then retreated.

Next step was to counter the efflorescent salt problem by applying Tile Doctor Acid Gel which being an acid neutralises the alkaline salts and removes other problems such as grout smears. The gel was worked in using a 200-grit diamond pad fitted to the rotary floor buffer. Afterwards it was removed with the wet vac and the floor was wiped clean with slightly acidic water.Victorian Tiled Hallway Floor During Repair Restoration in Sheffield

Sealing a Victorian Tiled Hallway Floor

The floor was left to dry off for several days, before returning to apply the new breathable sealer. Beforehand the floor was tested with a moisture meter to ensure it was fully dry.

The readings were fine so the floor was sealed with Tile Doctor Seal & Go Extra which is a full breathable sealer and gives the floor a nice satin finish. Nine coats of Seal and Go Extra were applied in total.Victorian Tiled Hallway Floor After Repair Restoration in Sheffield

Once done the floor looked brand new and my client was very pleased. The new sealer also blended in repaired section of Victorian tiles with the original.Victorian Tiled Hallway Floor After Repair Restoration in Sheffield

For aftercare cleaning I recommended the use of Tile Doctor Neutral Tile Cleaner. Most of the tile cleaning products you find in supermarkets are simply too strong for the sealer and can degrade them prematurely.Victorian Tiled Hallway Floor After Repair Restoration in Sheffield

Source: Victorian Tile Cleaning and Restoration Service in South Yorkshire