Archive

Monthly Archives: February 2024

This Terracotta tiled floor was in the kitchen of a house in the river side town of Woodbridge. The client had inherited the property and was looking to freshen it up prior to selling. The house had terracotta floors in nearly every room on the ground floor including a cellar, some areas of which were showing signs of damp.

Terracotta Tiled Floor Before Cleaning Woodbridge

After visiting the property, I could see the terracotta clearly hadn’t been sealed for some time as the dirt was well ingrained into the pores of the tile and it would need a deep clean to get it all out. After carrying out a few tests I was able to come up with a renovation plan and produce a quote for the work. Happy to proceed we agreed a date for the work to begin which would take four days.
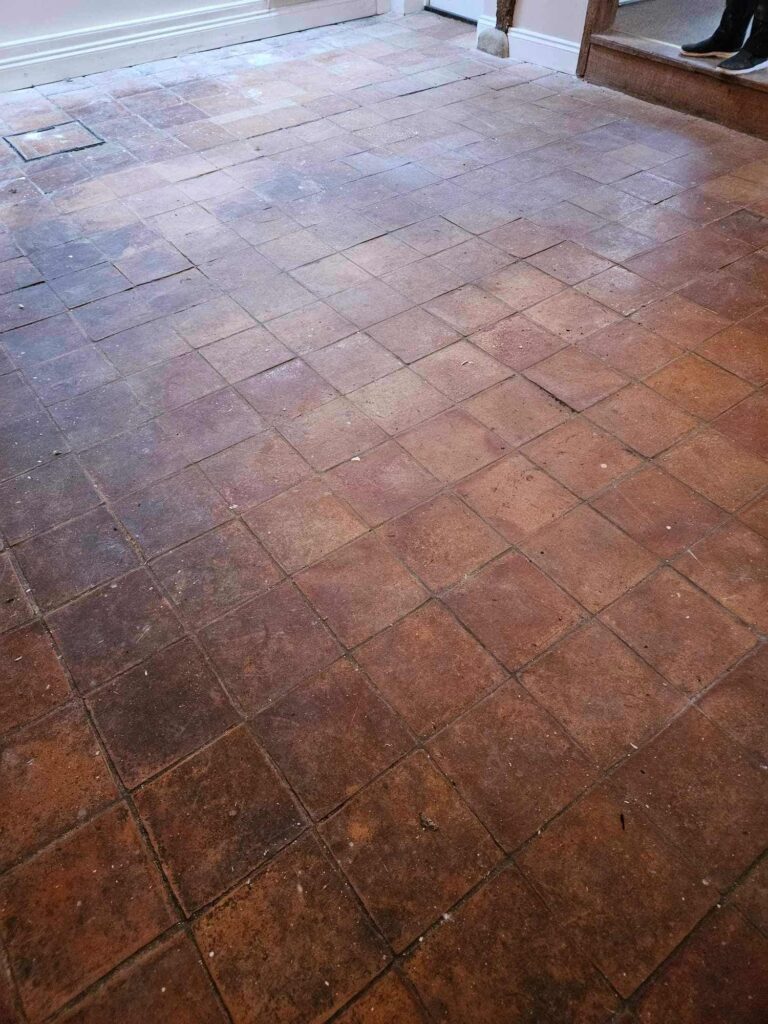
Terracotta Tiled Floor Before Cleaning Woodbridge

Cleaning a Terracotta Tiled Ground Floor

To get the floor clean I started with a strong dilution of Tile Doctor Pro-Clean, which was applied to the tiles and left to soak in for ten minutes. The dwell time gives the product time to break down the soiling before scrubbing. The product was then worked into the tile and grout using a Black pad fitted to a rotary floor machine.

The grout was also scrubbed by hand using our wire brushes to get it as clean as it could be. All the soils released from the tile were rinsed away with water and then extracted using a wet vacuum. Most of the floors were quite dirty so after inspecting the floor they were re-treated until we were satisfied. Five litres of Tile Doctor Pro-Clean were used in the process.

The damp areas were treated to an acid wash using a product called Tile Doctor Acid Gel, this neutralises any alkaline efflorescence that may have built up in the floor. The gel was brushed into the floor and then the resultant slurry removed by rinsing and the wet vacuum as before.

Sealing a Terracotta Tiled Ground Floor

The floors were then left to dry out over a weekend, and we then returned the following week to apply a sealer. Before doing so several moisture readings were taken with a damp meter to make sure the floor was dry. The readings were satisfactory, so the floors were then sealed with Tile Doctor Colour Grow, which is a breathable impregnating sealer. There were several floors to do and with Terracotta being quite porous five litres of sealer were needed for this.

Terracotta Tiled Floor After Cleaning Sealing Woodbridge

The client was happy that we had managed to get the floors looking so good. We left a free bottle of Tile Doctor Neutral Cleaner for the client to use to maintain their floor. This should keep it looking good and the property now looked much more appealing to a potential purchaser.

Terracotta Tiled Floor After Cleaning Sealing Woodbridge

Source: Terracotta Floor Cleaning and Renovation Service in Woodbridge Suffolk

When deciding whether to purchase marine plywood or regular plywood, you need to consider the advantages of each with regard to your flooring project.

Advantages of Marine Plywood over Regular Plywood

Whether used as a floor or a subfloor, marine plywood resists rotting, warping and shrinking. It resists humidity from steam and can stave off absorbing stagnant water. It even holds up well against boiling water! This makes it a superb option as an underlayment for your kitchen or bathroom floor. At lumber yards, it is usually stored indoors, and this also enhances its moisture-free nature.

Marine plywood is also stronger and more durable than regular plywood, which has only three layers. Marine plywood has five or more layers that are bound together with waterproof adhesive, which allows it to bear heavier loads and repel moisture from its core. As a result, you can use a thinner sheet that will have the strength of a thicker, regular sheet of plywood. In addition, it doesn’t have as many voids as regular plywood, which makes it structurally stronger. While regular plywood has little spaces and air pockets in each layer, marine plywood has substantially fewer. The extra strength and durability makes marine plywood a good subfloor for heavy flooring materials, like ceramic tile.

Marine plywood is available in a variety of thicknesses just like regular plywood. However, it is easier to bend and cut. This makes it ideal as a subfloor, since you will doubtless be making many cuts to get it to fit around door jambs, cabinetry, awkward corners, and other tight spaces. Unlike regular plywood, it is usually rated higher, having fewer visual defects like knots. Its surface is smoother and less splintery. It takes paint well and could make a beautiful finish as a top floor—something that regular plywood could not do.

Advantages of Regular Plywood over Marine Plywood

Regular plywood is much less expensive than marine plywood. A sheet can cost £8 to £40, as opposed to the cost of marine plywood, which ranges from £56 to over £160 a sheet. It is also easier to find. While marine plywood is not available everywhere (and acquiring it may entail shipping charges) regular plywood is available at nearly every lumber yard and home improvement store. It is the standard for interior floor underlayment in residential construction. Unless you are installing flooring inside a recreational vehicle or a boat, regular plywood will probably do the job.

Making the Choice

Consider exactly what you need by estimating the amount of moisture your floor will be exposed to. If your home has suffered from toxic molds in the past, marine plywood may keep your home healthier. If your climate is very sticky and damp in the summer, and the steam from the shower just never seems to evaporate, marine plywood would protect your bathroom floor from eventual damage. On the other hand, if you live in a desert climate with low humidity or have never had moisture problems, molds, or leaks, the cost of marine plywood would probably be an unnecessary blow to your wallet.

Source: www.DoItYourself.com

If any carpets in your home have recently fallen victim to any manner of filth, you may be curious how to remove dirt from carpet. Fortunately, there are a number of simple and effective ways to make your carpet dirt-free in no time.

What You’ll Need:

  • Spray bottle
  • Baking soda
  • White wine vinegar
  • Warm water
  • Mild detergent
  • Carpet cleaning products
  • Sponge, washcloth, scrub brush, or paper towel

1. Use a Commercial Carpet Cleaner

Commercial carpet cleaning products, such as Resolve and Woolite, can often prove very effective at removing dirt from carpet. To utilize these products for carpet cleaning purposes, simply spray them onto the carpeted area you wish to clean, paying special attention to the dirtiest spots, then allow them to set in for the amount of time specified on the packaging so that they can penetrate and break down stains and dirt deposits. Then, after allowing your cleaner to sit, use a sponge, washcloth, scrub brush, or paper towel to wipe your carpet clean. If any dirt remains, continue to repeat this process until the carpeted area is completely free of dirt.

Once the carpet has been successfully cleaned, use a spray bottle filled with warm water to rinse away any remaining traces of your carpet cleaner. Given the high chemical content in many commercial cleaning products, make a point of being as thorough as possible when performing the final rinsing. Also, never combine commercial cleaners, as the results can produce hazardous fumes and chemical reactions.

2. Use a Vinegar-based Carpet Cleaner

If you’re bothered by the potent chemicals found in most over-the-counter cleaners or simply don’t feel like paying top dollar for commercial products, you’ll be pleased to learn that you can easily produce your own homemade carpet cleaner. To do this, take an empty spray bottle and create a mixture of ¼ cup baking soda, ¼ cup white wine vinegar, and ½ cup warm water. After adding your ingredients, close the bottle and gently shake it until your cleaning solution forms. Then, in much the same fashion as a commercial carpet cleaner, spray this newly formed solution onto your dirty carpet, taking care to apply a little extra to any stained or noticeably filthy areas. Once the solution has been applied, give it 3 to 5 minutes to penetrate the dirt on your carpet. Due to its acidic nature, vinegar is very good at breaking up stains. Next, use a sponge, washcloth, paper towel, or scrub brush to give the carpeted area a vigorous scrubbing, thus removing all the dirt from your carpet in the process. Follow up with a warm water rinsing.

3. Use a Homemade Soap and Water Carpet Cleaner

If the dirt on your carpet doesn’t seem to have set in, it can be effectively removed with an easy-to-make soap and water cleaning solution. To produce this solution, just combine a mild liquid soap and warm water in an empty spray bottle, then seal the bottle and shake it until the solution begins to sud. Dish-washing liquid typically works best for this solution, but hand soap is generally okay, too. Apply this solution in the exact same fashion as the previously discussed cleaners, then proceed to remove the dirt from your carpet with a sponge, washcloth, scrub brush, or paper towel. Rinse the solution with warm water once the dirt has been purged.

Source: www.DoItYourself.com