Archive

Monthly Archives: June 2022

A client from Fordham on the outskirts of Cambridge called us in to renovate their polished Limestone flooring that ran throughout the ground floor. Years of general wear had made the stone lose it lustre and the client wanted it looking its best as they were looking to sell the property.

Large Limestone Floor Before Polishing FordhamWC Limestone Floor Before Polishing Fordham

Polished stone flooring does look incredible and gives any property a premium feel, however it does require regular maintenance if it’s to look its best. In fact, Tile Doctor offers a Maintenance Plan for floors like this one where we pop back once or twice a year to re-polish the stone with a high grit pad and top-up the sealer.

Without maintenance of this nature the polish will slowly wear down and eventually the sealer will fail allowing dirt to becoming ingrained in the stone and making it difficult to keep clean. The solution is to strip what’s left of the old sealer off the stone, bring up the polish using a set of diamond burnishing pads (Honing) and then re-seal and this is what I recommended for this Polished Limestone floor.

Kitchen Limestone Floor Before Polishing FordhamLarge Limestone Floor Before Polishing Fordham

Cleaning and Honing a Polished Limestone Tiles

Before beginning the restoration, I took the usual precaution of covering the walls and kitchen units with thin blue plastic to protect them from exposure to any cleaning products or mess.

Working in the different areas one by one my first task was to give the Limestone a deep clean using a dilution of Tile Doctor Remove and Go, which is a coatings remover designed to break down any old sealant remaining on the tiles. This product is scrubbed in and then extracted, as well as removing the old sealer it also does a good job of cleaning the stone and grout. To extract the soils and clean the tiles afterwards I use a high-pressure hot water cleaning and extraction machine which is built into my van and keeps any mess to a minimum.

After completing the initial cleaning process, I moved on to honing the stone which slowly restores the polished appearance. This is done using a set of Diamond encrusted burnishing pads of different grits which slowly resurface the appearance of the Limestone tile removing scratches and other imperfections.

The process starts with the application of a coarse 400-grit pad, fitted to a rotary machine and is applied only with water to help lubricate the process. The resultant slurry is then rinsed away and the process repeated with a medium 800-grit pad again with water. At this point the polish on the stone starts to build and after another rinse and extraction is followed by a fine 1500-grit pad.

Finally, a very Fine 3000 grit pad is applied dry with only a little water sprayed onto the stone. The process of burnishing is a gradual but highly effective means of achieving this kind of finish.

Sealing Limestone Tiles

After burnishing the tiles and to achieve a really hard wearing and high polish I covered the floor in Tile Doctor Shine Powder crystals and buffed them into the Limestone tiles using a White buffing pad. Then to give the floor extra protection I applied a couple of coats of Tile Doctor Ultra-Seal, which soaks into the pores of the stone to prevent dirt from becoming ingrained there.

Large Limestone Floor After Polishing FordhamKitchen Limestone Floor After Polishing Fordham

Ultra-Seal was chosen because it’s an invisible sealer which won’t affect the appearance of the Limestone resulting in a very natural appearance. You won’t realise its there until you spill something on the floor and then you will notice it pooling on the tiles to form a bubble that can be easily wiped off.

It took some time, but once completed the Limestone looked great with a really deep high shine that the light bounced off.

Large Limestone Floor After Polishing FordhamWC Limestone Floor After Polishing Fordham

Source: Limestone Floor Cleaning and Renovation Service in Fordham Cambridge

While radiant heat flooring has been used to heat buildings in Japan and Korea for decades, due to their low petroleum resources, it is fairly new to North America. Two primary types of radiant heat flooring are currently available, electric radiant and hydronic radiant. Learn more about these two options and their costs below.

Radiant Heat Flooring Overview

When you consider the physics behind heating a room, heating the floor makes a great deal of sense. Heat rises in a room from its lowest point to the highest, so it is logical to place the heat source as close to the floor as possible. Radiant heat flooring is suitable for use in just one room, like the bathroom where you want the floor to be warm all the time, or it can be installed throughout the house easily when you upgrade the floors. In independent tests, radiant heat flooring warms an entire room more effectively than baseboard heaters or steam radiators. Depending on the price of electricity where you live, either electric radiant floor heating or a hydronic radiant floor system will be the best option for your home.

Electric Radiant Heat Flooring

With this radiant heat flooring system, an electrically wired mat is placed on top of the room’s subfloor just below the floor finish. Electric radiant floor heating is suitable for use under hardwood, tile, and carpet finishes. It can be used for just one room or throughout the house. Installing electric radiant floor heating is cost-effective. You can outfit a bathroom with this heat source for between $300 and $900. It will have its own thermostat, so you can turn it on and shut it off as required. Electric radiant heat flooring takes only about half an hour to warm a room completely.

Hydronic Radiant Heat Flooring

This steam-activated heat system for floors is usually installed for an entire house at the construction stage. The plastic tubing mats are laid into the subfloor, raising the main floor covering about two inches. It is ideal for climates where the outdoor temperature is most often below 70 degrees F. (21 C.). In a hydronic system, a boiler and pump are installed in the house’s basement and continuously circulate hot water through the pipes. Subfloors need to be accessible for maintenance, and the floors must be built to higher weight specifications to support the tubing and its concrete base.

The cost to install hydronic radiant heat flooring is substantially higher than for electric, at up to $5 per square foot for materials for a home of 1,500 square feet. Where the cost of electricity is higher than average, hydronic radiant heat flooring is more cost-effective in the long term than electric radiant heat flooring. You can use any energy source to power the boiler: electricity, natural gas, oil, or even solar energy collectors. The system is left on to keep the rooms at a comfortable temperature all year round.

To heat individual rooms in your home, choose electric radiant heat flooring. For whole-home heating, consider hydronic radiant heat flooring.

Source: www.DoItYourself.com

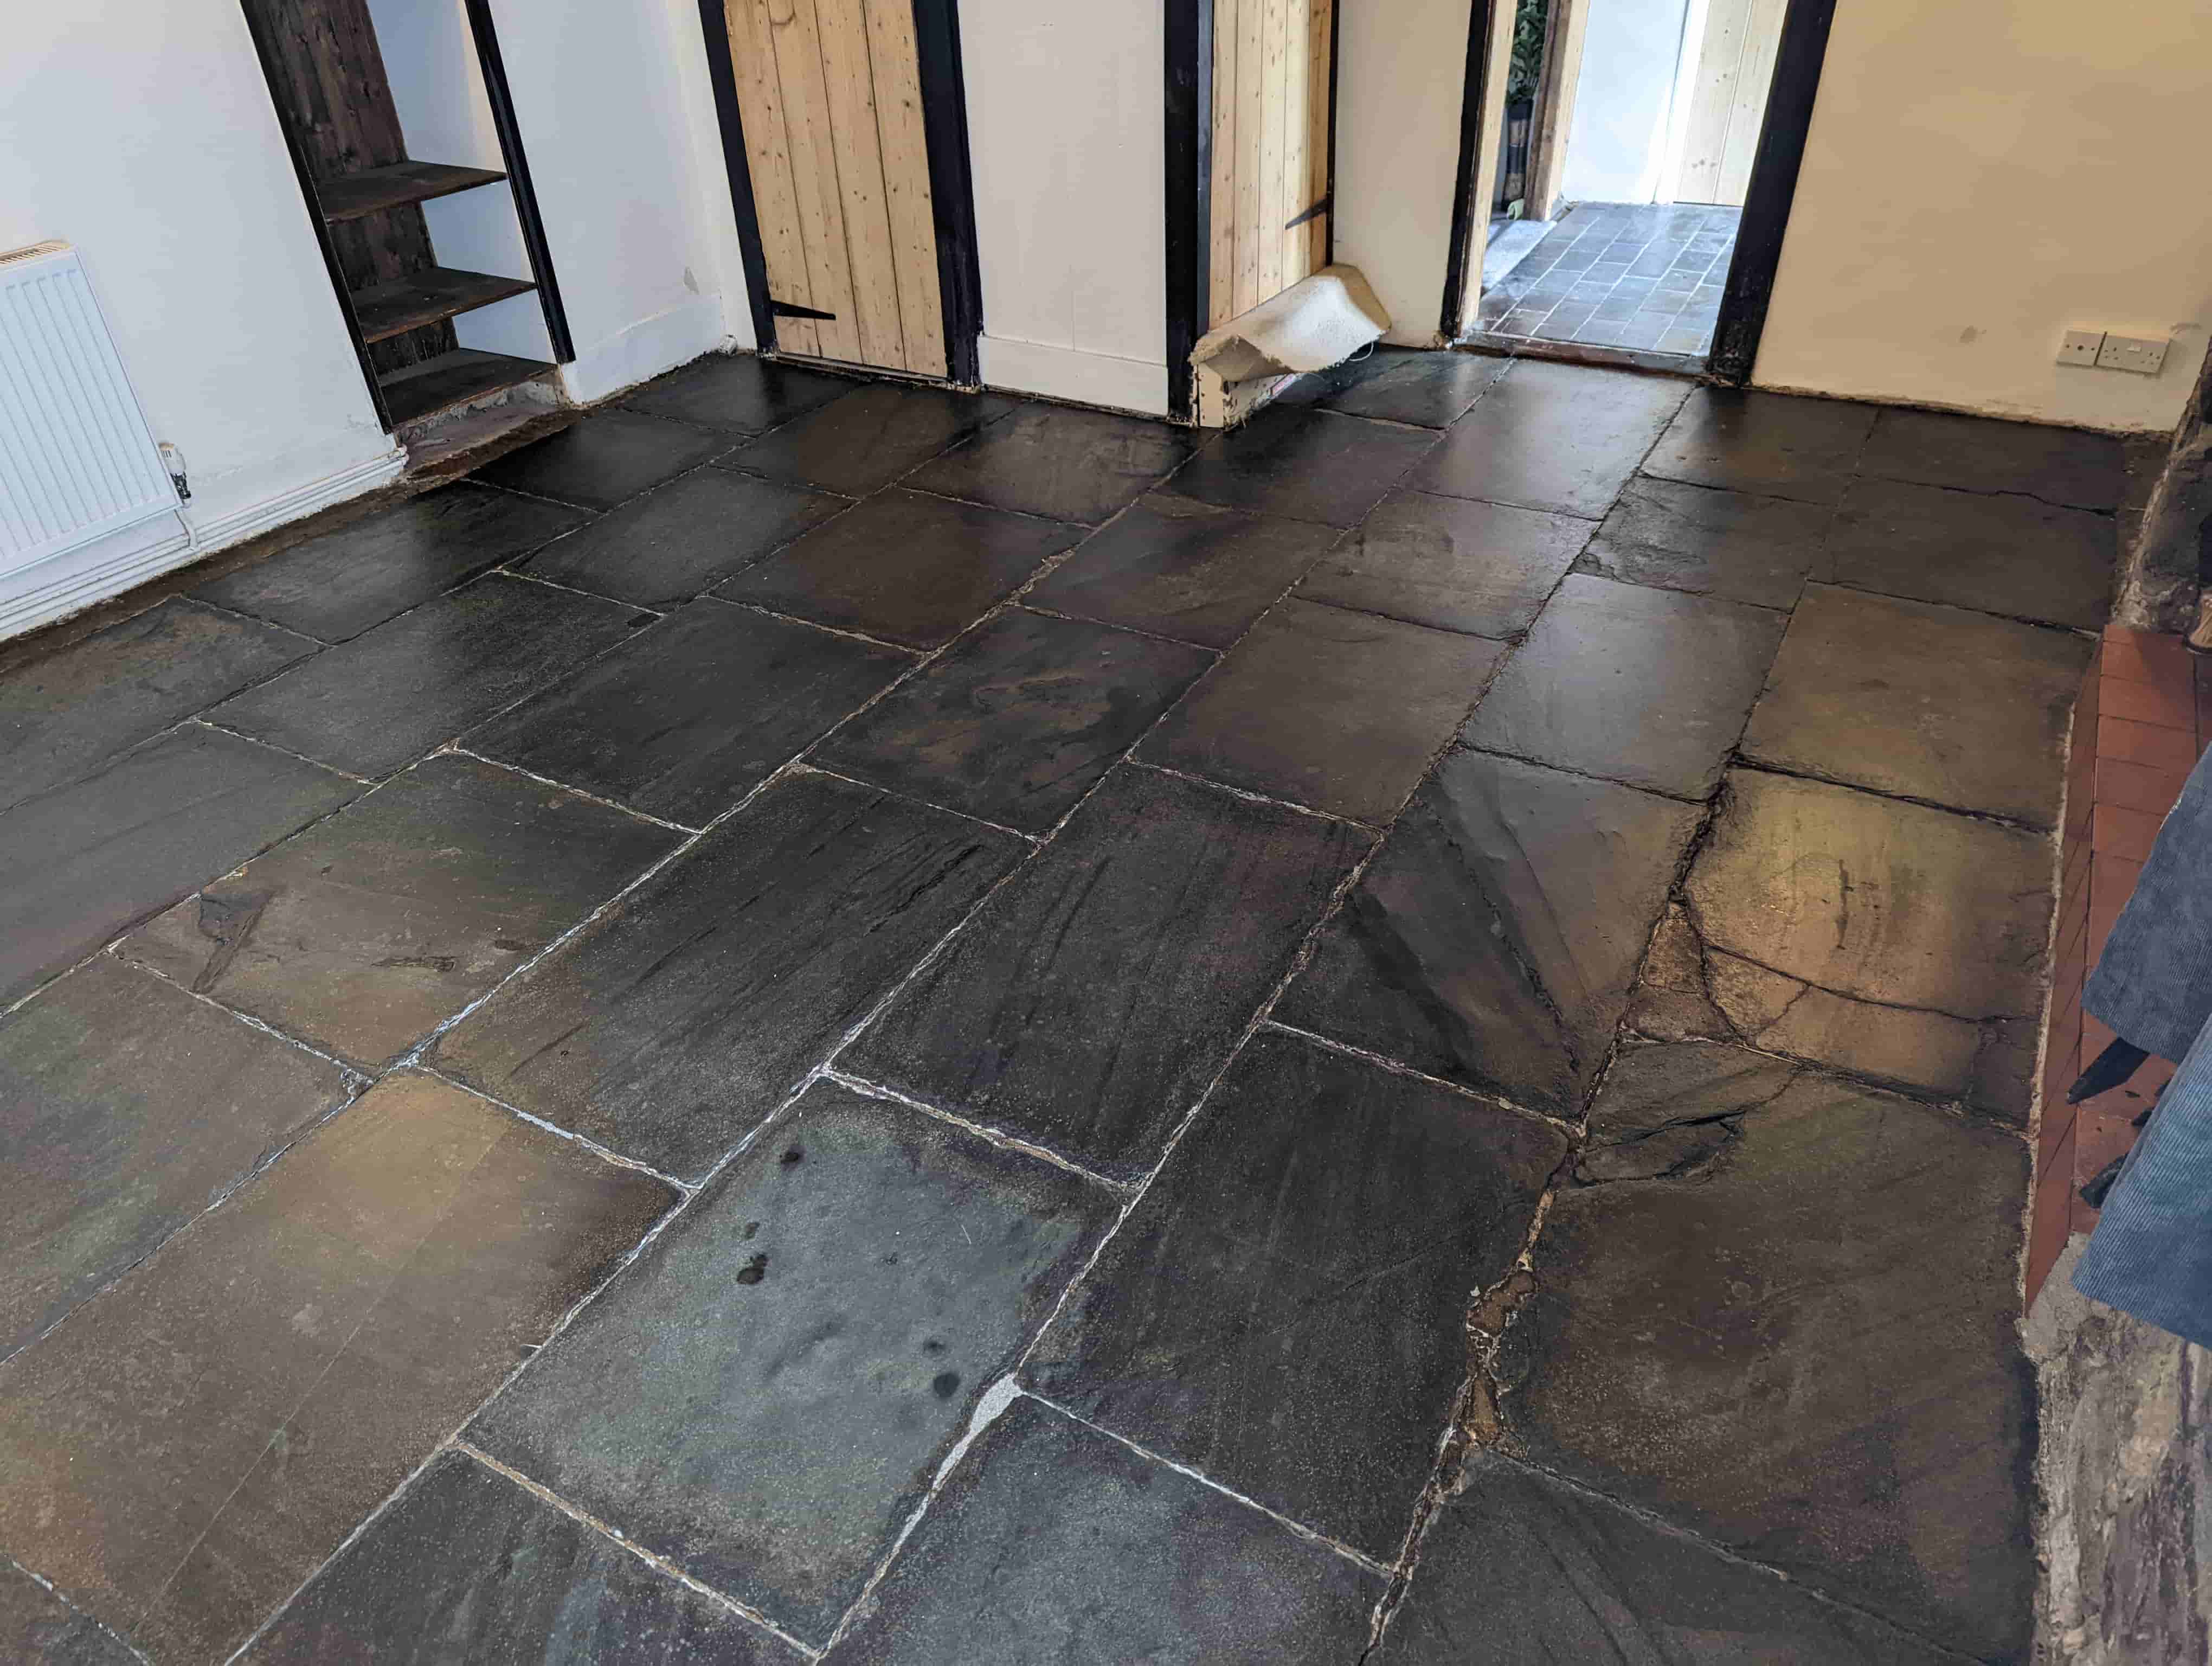
Whilst surveying this 200+ year old floor at a cottage in Bideford the owners told me that they were quite set on pulling up their original Slate flagstone floor and replacing with new stone, but they wanted to make sure they had explored every option before making that decision.

Slate Flagstone Floor Before Restoration Bideford

The floor, which is around 45m2, had previously been covered in old underlay and carpet for some time. There were damp issues, some relatively significant shale in areas where the moisture had sat and enough paint stains on the floor to give the walls another coat 😊

I reassured them that the floor had plenty of life left and could be rescued, and once done it would be a real feature of the property that matched its age. Removing and replacing at huge cost would not be necessary. They accepted my quote and we set a date for the work to start.

Resurfacing and Cleaning a 200-Year-Old Slate Flagstone Floor

Day 1 started with resurfacing the old Slate flags using a coarse 50-grit diamond pads which was fitted to a weighted rotary floor machine. These pads cut back the old, tired surface of the stone and reveal a new untainted surface removing the shaling stone and paint marks stains,

This process also opens the pores in the stone allow the long-standing moisture to finally evaporate overnight. Although the machine does most of the hard work its meticulous work and requires rinsing and extracting to remove the soiling.

It’s slow meticulous work and once the whole floor had been completed, I moved on to a 100-grit and then a 200-grit pad to slowly close the pores in the stone and restore the appearance of the Slate.

To fully restore the appearance of the Slate I then applied a finer 400-grit diamond burnishing pad which removed the remaining scratches and swirl marks. At the end of day 3 I knocked out a few troublesome joints and re-pointed these areas with a German Resin based jointing mortar called VDW800.

Sealing Old Slate Flagstones

By day 5 the Slate floor was ready to be sealed for which I applied two coats of Tile Doctor X-Tra Seal which is a premium oil-based product that works well on old stone floors like this one.

The natural stone colours and mineral patterns soon began to pop out again leaving a stunning and freshly restored Slate flagstone floor. The owners were over the moon with the results. They had not only saved the largest internal original feature in the cottage but had also saved money as well. A great result.

Slate Flagstone Floor After Restoration Bideford

For aftercare I recommended the use of Tile Doctor Neutral Tile Cleaner which is a mild pH neutral tile cleaning product that will ensure the integrity of the newly applied seal and will keep the floor looking in this great condition for years to come.

Source: Slate Floor Cleaning and Restoration in Bideford, Devon

If you have a basement floor drain, you might be interested in finding a way to extend it so you can relocate it to somewhere else in your basement. Your basement floor drain will typically be located in the lowest area of your basement. However, you might also want to install a second basement floor drain next to your washing machine or water heater. In this case you will want to find out how to extend your basement floor drain.

What You’ll Need:

  • Circular saw
  • Hole cutter
  • PVC plumbing pipe
  • Drill
  • PVC fitting accessories
  • Concrete
  • Drain cover
  • Drain

Step 1 – Choose the Location

You must first decide on the location for your new basement floor drain. Once you know the location of the drain, you can measure and check that you have the right length of pipe required.

Step 2 – Drill the New Basement Floor Drain

Use your hole cutter and drill to cut the hole required for the drain. Cut the hole to the right depth required for the drain. Remove the concrete by using a chisel. (You could also use a normal drill bit to break the concrete into smaller pieces if required.)

Step 3 – Cut the Trench

Next use the circular saw to cut the trench where you will run the pipe. Cut through the concrete slowly and make sure that you are as accurate as possible. After you cut the trench, you can break up the concrete with a drill or chisel. Then remove the concrete from the hole so you can lay pipe.

Step 4 – Lay New Pipe

Start by covering the bottom of the hole with a small layer of sand. Then you can lay the new length of PVC pipe. You will need to connect the new pipe to the original drain. If you can’t connect it, replace the drain with one which has another connection. Connect into the new drain so that it’s watertight. Use sealant to seal the gaps if necessary.

Step 5 – Check the Basement Floor Drain

Before concreting the basement floor drain, you should spend a couple of minutes checking that the drain works properly. Pour some water into the drain and check that it doesn’t leak.

Step 6 – Concrete the Pipe

Now you can place a layer of sand over the pipe and use concrete to seal in the pipe. After the concrete dries, put the cover on the drain and try it out again.

Source: www.DoItYourself.com

A floor furnace is a home heating system fueled by gas. Furnaces can be extremely dangerous if not handled properly. To maintain a safe living environment, practice the nine safety tips below.

1. Thermostat Location

To provide accurate furnace temperature readings the thermostat must be located in the same room as the furnace grill. Never install the thermostat in a separate room.

2. Leaking Gas

Sometimes, a faulty vent or gas line may emit gas. If you smell gas around the furnace, do not light a match, candle or any sort of flame. Any lit fire can easily cause an explosion when there is a gas leak.

A hissing or whistling noise is a sure sign ofleaking gas. However, it may be more difficult to determine the gas leak at other times. It is best to use soapy water to detect the exact spot of the leak.

First turn off the gas. Fill a spray bottle with some soapy water and spray the gas connections. Turn on the gas. Wherever you notice bubbles, this indicates a gas leak.

Do not light any appliance when you detect a gas leak. Avoid all electrical switches and phone usage in the entire house. Leave the house before calling your gas supplier or fire department.

3. Leaking Floor

Always be alert for any signs of water leakage. Water can infiltrate into the furnace and disrupt the control system. Any water leakage, especially in the floor, is a danger to the furnace.

Turn off the gas and call for a service technician to inspect the furnace. Any part that has been infiltrated by water will have to be replaced.

4. Ventilation

Always ensure the air flow in your household is proper. Combustion and venting particularly require adequate air. Bad air flow will hamper the furnace’s efficiency.

5. Children and Pets

Always take care to keep your children and pets away from the furnace, especially the grill. This gets extremely hot during operations. Close contact can cause severe scalds or burns.

6. Vacuum Regularly

This is a good practice that will help prevent accumulation of lint in your furnace. Be sure to always keep the burner compartment clean. This will minimize the risk of accidental fires.

7. Don’t Block Grills

It is a dangerous practice to block the air flow from the grills in any way. Do not place household items such as clothes, rugs, or furniture over the grills. This can easily trigger a fire which may destroy your house.

8. Gasoline, Flammable Liquids, and Vapors

Do not store any of the above items near the furnace. These items can easily cause a fire or explosion. Grave injuries can result as well as extensive destruction of your property.

9. Performance Check

Have a qualified engineer or service person undertake a regular check on the furnace and venting system. This can be done once or twice a year.

When not well installed and maintained, a venting system can result in carbon dioxide poisoning. A regular check will forestall any dangerous emissions.

It will also identify any other defects or faults in the system. Corrective measures can then be effected.

Source: www.DoItYourself.com