Archive

Monthly Archives: December 2022

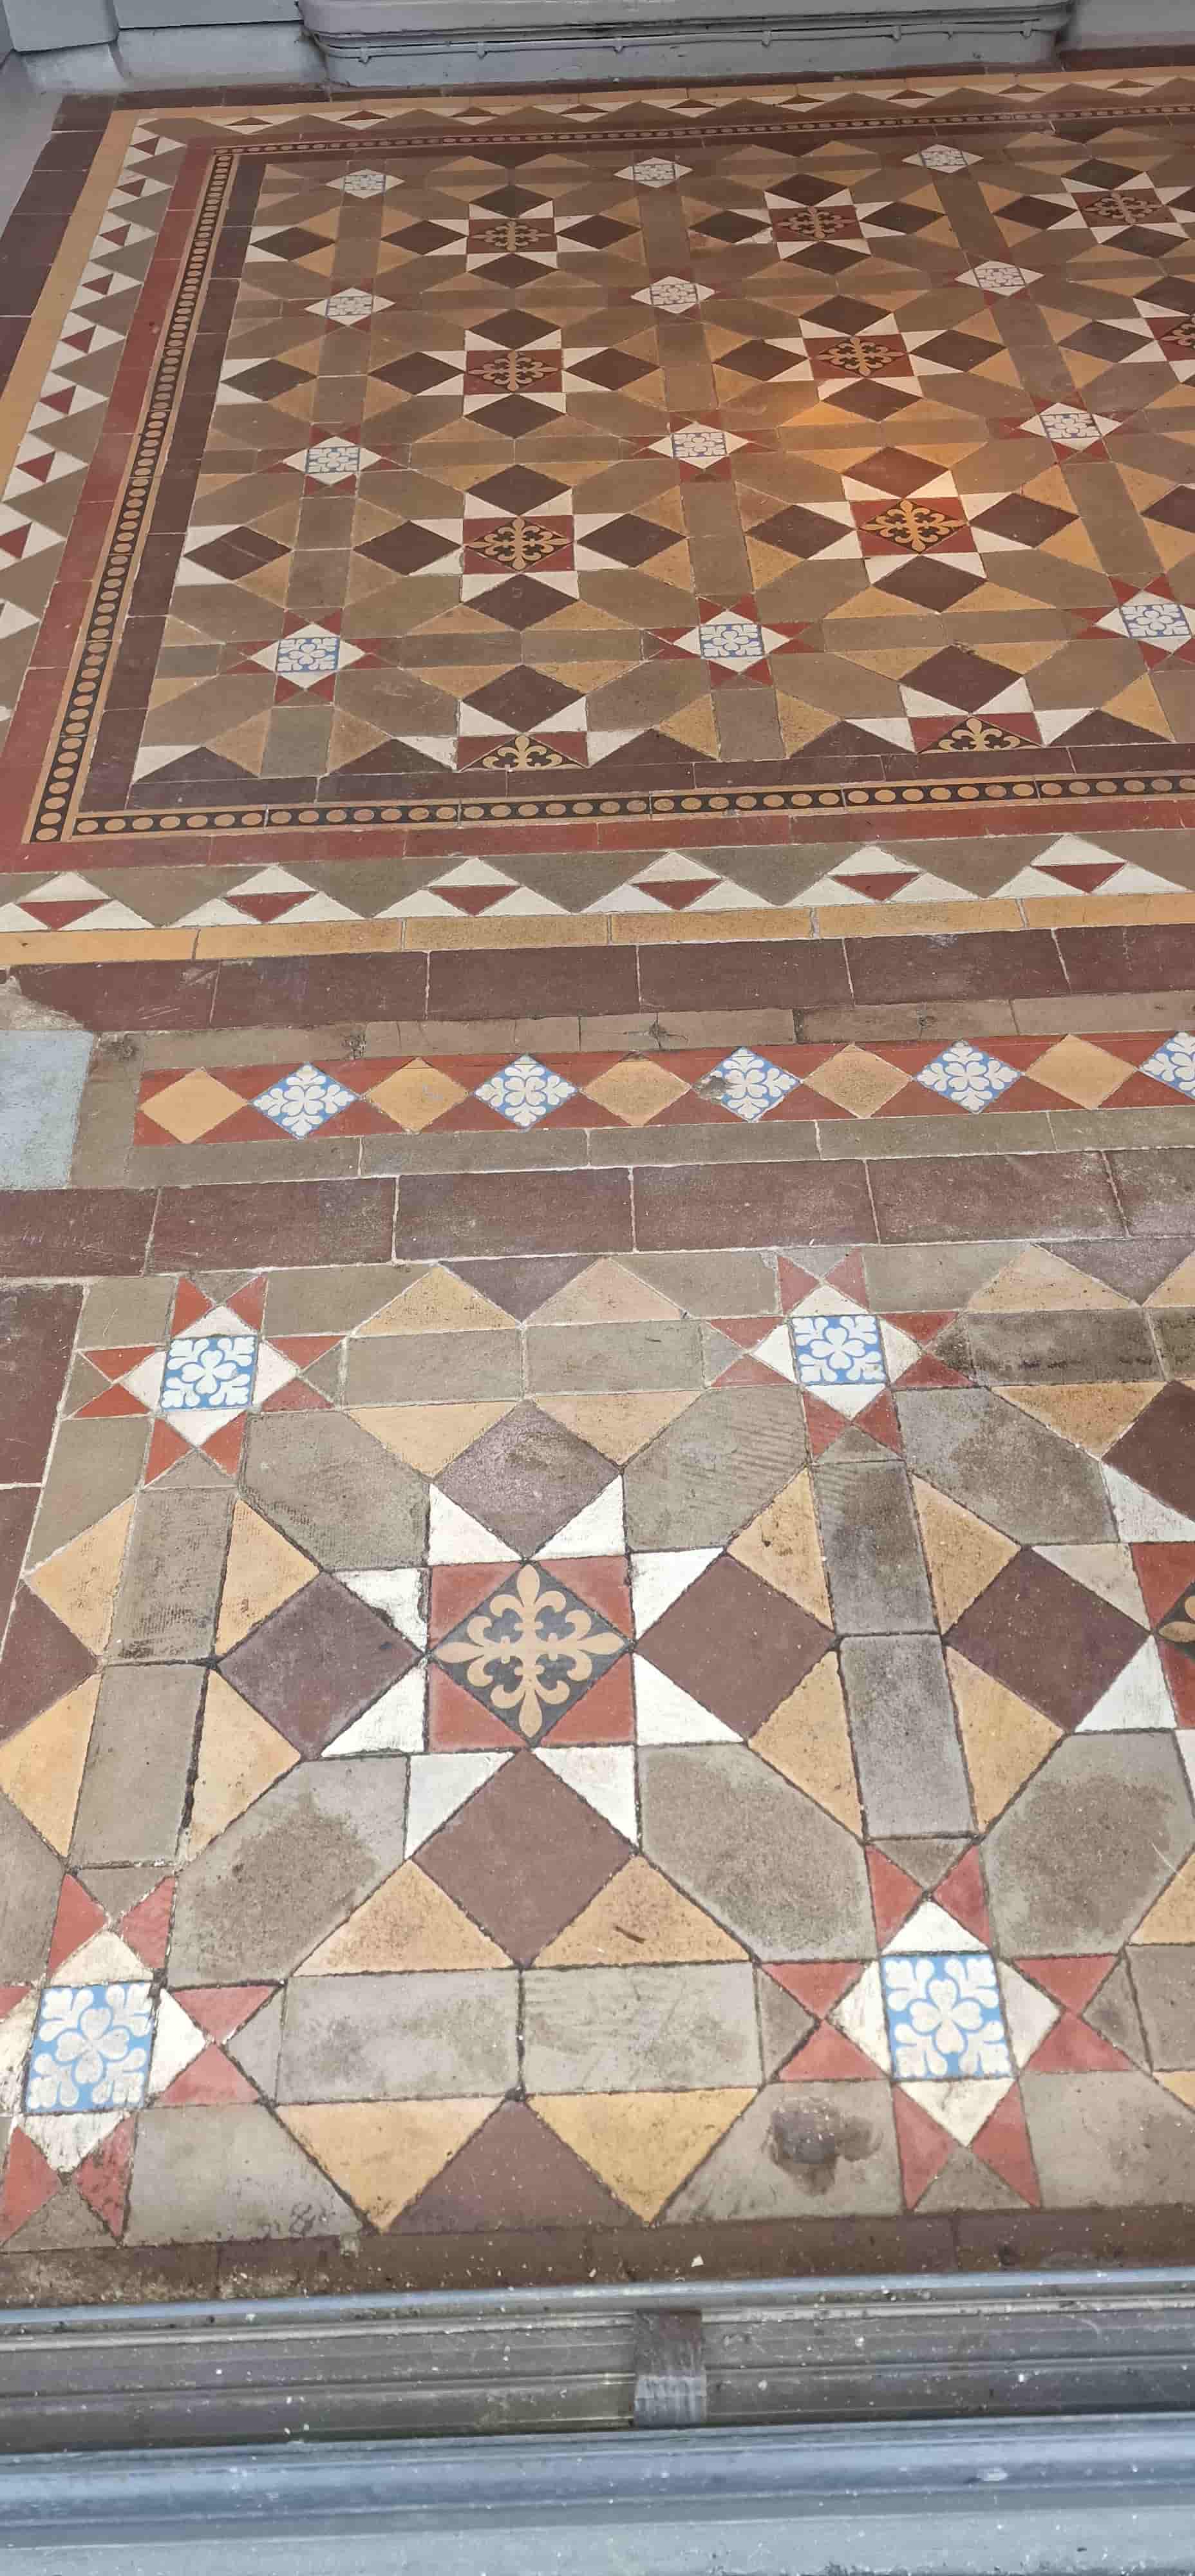
Details below of a another Victorian Hallway floor restoration that we completed recently in Edinburgh. The owner of the property was unhappy with how dull the floor had become and was keen for it to be renovated back to health.

Old Victorian tiles are porous and so do need to be sealed to protect them from ingrained dirt and staining, unfortunately sealers don’t last for ever and do wear down with use so if you want to keep your floor looking clean you do need to maintain the sealer.

Victorian Tiled Hallway Before Renovation Edinburgh

I’ll add more detail below but in total this project took three days to complete as there were a lot of tiles that had to be lifted and fixed back down again, this was all done on the first day and once set the whole porch area had to be regrouted.

Renovating a Victorian Tiled Hallway Floor in Edinburgh

As mentioned above the first day was spent ensuring the tiles were secure. This involved checking every tile by hand in the hallway and porch floor and identifying all the problems so they could be removed cleaned up and then re-laid with fresh adhesive.

It’s a lot of manual work but by the end of the first day the tiled floor was solid and ready for cleaning although I decided to come back to do the cleaning a few days later to give the repairs time to set.

Old floors like this one don’t have a damp proof membrane under the floor so you have to be wary of how much water you use during cleaning, if you use too much it could take days or even weeks before the floor dries out you can seal it. Fortunately, we have a solution and for situations like this we adopt a method called “Low Moisture Cleaning”

Victorian Tiled Hallway During Renovation Edinburgh

This method primarily involves giving the floor an acid rinse using Tile Doctor Acid Gel which being a gel is very easy to control. The gel is applied to the floor and left to dwell for a while before it is worked in with a coarse 200-grit burnishing pad. Then after going over the floor a few times with the pad the slurry extracted with a wet vacuum. The process was repeated two to three times until I was satisfied that tiles were as clean as possible. I then wiped the floor using a damp cloth dipped in a bucket with a mixture of Grout Clean-Up and water.

This method allowed us to get the tiles as clean as possible without the need of any alkaline cleaning products which can cause efflorescence issues later when the floor dries. Efflorescence is a common problem on floors of this age where a damp-proof membrane has not been fitted; moisture rises through the sub floor and tile carrying salts which then get deposited on the surface of the tile as the moisture evaporates. Once complete the floor was left to dry off overnight with an industrial fan in place to help with the drying and to ensure it would be ready for sealing the next day.

Sealing a Victorian Tiled Hallway Floor

On the final third day we returned to seal the floor testing the moisture level first with a damp meter to ensure the floor was dry. The results were positive, and I was happy that it was within the correct tolerance for the sealer to be effective. To seal the floor, we used Tile Doctor Colour Grow, applying three coats and letting each coat dry before applying the next.

Victorian Tiled Hallway After Renovation Edinburgh

The sealer enhanced the deep colours in the tile and gave the floor hardwearing protection that should last many years to come, the fresh sealer will also make them easy to clean. I should mention that Colour Grow is also fully breathable which is perfect for a floor with no damp-proof membrane, in that it won’t trap moisture under the tiles where is could eventually spread to the walls and lead to rising damp.

Before leaving I took time to explain the importance of using a neutral pH tile cleaning product such as Tile Doctor Neutral Cleaner for day-to-day cleaning. A lot of products you find in supermarkets contain bleach and are simply too strong for cleaning a sealed surface and will quickly erode the sealer with use.

Victorian Tiled Hallway After Renovation Edinburgh

Source: Victorian Tile Cleaning and Renovation Service in Edinburgh

Today, there are many varied choices regarding bathroom floor covering. Listed below are short descriptions of all the available options for covering your bathroom floor.

Carpets

The biggest advantage of carpets is that they feel soft under the foot and are non-slip. Also, carpets are relatively cheaper than the other available options. Using carpets has its own drawbacks. If you do not clean your carpet regularly, it will become dirty and mucky. Also, after a few years, you will need to change your carpet, regardless of your cleaning regime. Nowadays, foam-backed carpets have become quite popular for bathroom usage. While these have certain advantages over the regular carpets, you can choose either option.

Carpet Tiles

The single biggest advantage of carpet tiles is that when a particular area gets dirty, you only have to change that particular tile. Keep in mind that there is not much variety in carpet tiles, so if you are looking for a specific color or pattern, you should opt for carpets. Another disadvantage of carpet tiles is that they are not as easy to clean.

Ceramic Tiles

Ceramic tiles have gained popularity as ideal bathroom floors. For one, ceramic tiles are non-porous and can be cleaned easily. Also, they are resistant to moisture and allergens, reducing the chances of infection. They are also very easy to install and are available in many different colors and patterns. When it comes to the negatives, the only major drawback is that they are prone to breakage during installation. Also, these tiles are cold to touch and slippery when wet. If you choose to use ceramic tiles, consider using a bathroom rug to overcome some limitations.

Stones

Using stone is an expensive option, but if you have the money, it can add beauty and elegance to any room. Available in different colors and textures, depending on the stone used (limestone, marble, granite, slate, etc.), stone tiles are considerably durable. They are cold and slippery when wet, so consider using sealants and under-floor heating.

Laminates/Vinyl

Laminates are the least popular choice of flooring for your bathroom. While there are manufacturers who provide laminate flooring options for bathrooms, there are many restrictions involved to ensure durability. Keep in mind that laminate flooring for bathrooms requires a specific installation technique. Vinyl flooring, on the other hand, is much easier to install. It is similar to laminates in appearance. The advantage that vinyl has over laminates is that it is waterproof. Among the drawbacks of vinyl is that it can be quite slippery when wet, albeit it is never cold.

Bamboo

Nowadays, bamboo flooring is being used in bathrooms. As compared to the other hardwood flooring, bamboo is far more suitable. There are 2 types of finishes available in bamboo, namely, natural and carbonated. The former is considered to be tougher. Installation techniques for bamboo floors are varied, so always check with your manufacturer before installation.

Pointers

The color or pattern of the flooring can significantly impact the look and feel of your bathroom. Use lighter colors to keep your bathroom looking clean and spacious.

When deciding the choice of flooring, remember that waterproofing your bathroom floor is crucial. Water not only damages your floor, but it also causes the build-up of mildew and mold.

Source: www.DoItYourself.com

At some point you may want to remove epoxy flooring from your kitchen, basement, or garage, to change the color or replace it due to wear. Follow the procedure outlined below to remove epoxy flooring safely and with little difficulty from a space in your home.

What You’ll Need:

  • Box cutter knife
  • Stiff-bristled broom and dust pan
  • Vacuum cleaner, dry and shop-vac types
  • Epoxy stripping solution
  • String or fiber mop
  • Electric fan, as needed
  • Long-handled putty scraper
  • Wire-bristled brush
  • Pointed shovel
  • Large trash bags
  • Eye goggles, painter’s mask
  • Rubber gloves

Determine If Your Epoxy Floor is Solvent or Water-Based

Take a small sample of your epoxy floor to a building center to find out whether it is solvent or water-based. This will determine the type of stripping solution you should buy.

Purchase the Stripping Solution

Epoxy is meant to be durable. Therefore you’ll need to select the proper product to remove it. You can use either water-based epoxy stripper on water-based epoxy, or if you are highly sensitive to volatile compounds, choose a soy-based, environmentally-friendly epoxy stripper that emits low levels of fumes. You could also skip the strippers and grind down the epoxy with a carbide-tipped rotary tool.

Prepare the Floor for Stripping

Remove all furnishings, wall hangings, and window coverings from the room to prevent them from being splashed with a stripper or absorbing chemical fumes. Sweep the floor surface thoroughly and then vacuum to remove any dust, dirt, or flakes from the topcoat of the epoxy floor. Have the windows and doors in the area open to ventilate the room. Put on rubber gloves, eye goggles, and a painter’s mask.

Apply the Stripper

Pour on or spray on the epoxy floor stripping solution, starting in the farthest corner from the exit doorway. Cover each measured area of about 4X4 feet at a time. Use a string or fiber mop, not a sponge rubber type, to spread the stripping solution over the floor. Distribute the stripping solution all over the floor evenly.

Seal the Room to Let Stripper Soak

Close the doors and windows tightly, and seal off the room so that the stripping solution can soak into and dissolve the old epoxy for at least 24 hours, or as recommended on the container of stripping solution.

Peel off the Old Epoxy Layer

Open up the doorways and windows again, and put an electric fan in the room pointed toward a window to vent off the fumes. Put on your protective eye and hand coverings and a fresh painter’s mask. Using the long-handled metal scraper, push off the layer of epoxy flooring starting at one edge of the room and moving toward the door. Clear off a row at a time, twice the width of the scraper blade. Using the shovel, scoop the waste epoxy into trash bags and discard it safely.

Re-soak Stubborn Epoxy

If sections of epoxy will not come off the floor, soak these parts again overnight with the stripping solution, and scrub them the next morning with a brush with stiff wire bristles.

Rinse and Vacuum the Floor

When all the epoxy has been removed, rinse the floor with cool water and vacuum it up with a shop-vac. Then allow the floor to dry completely.

Source: www.DoItYourself.com